


EPSON EPL-6200/EPL-6200L Revision A
Troubleshooting Troubleshooting for Paper Jam 118
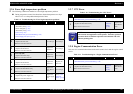
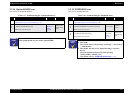
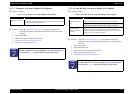
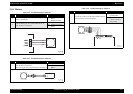
3.3.3.3 Transport Area Jam in Duplex Unit (Option)
Detection Timing
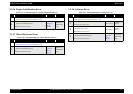
Solution: Check the “Initial Check Items” (p.116) first and then replace the
following components in the order named with new ones and repeat
checking.
1. Eject Sensor (PS3)
2. Duplex Unit Upper Transport Sensor (PC4)
3.
Main Board Assy (C533/C534 Main) (p.146)
4. Duplex Unit Control Board (p.163)
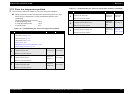
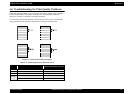
3.3.3.4 Paper Re-feed Area Jam in Duplex Unit (Option)
Detection Timing
Solution: Check the “Initial Check Items” (p.116) first and then replace the
following components in the order named with new ones and repeat
checking.
1. Eject Sensor (PS3)
2. Paper Feed Sensor (S1)
3. Duplex Unit Lower Transport Sensor (PC5)
4. Duplex Unit Control Board
(p.163)
5. Main Board Assy (C533/C534 Main) (p.146)
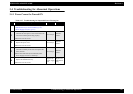
Table 3-25. Transport Area Jam in Duplex Unit (Option)
Category Explanation
Transport component
jam
The Duplex Unit Upper Transport Sensor did not turn ON even after
the passage of the predetermined period of time from interception of
the light to the Paper Eject Sensor.
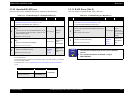
C H E C K
P O I N T
Before replacing any electrical part, check to see if the part in
question is defective or not by consulting “3.5 Troubleshooting for
Electrical Parts”
(p.121). Then replace the part, if necessary.
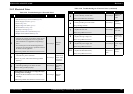
Table 3-26. Paper Re-feed Area Jam in Duplex Unit (Option)
Category Explanation
Paper pre-feed area
jam
The Paper Feed Sensor did not turn ON even after the passage of the
predetermined period of time from start of paper re-feeding.
The Paper Feed Sensor turned ON before the passage of the
predetermined period of time from start of paper re-feeding.
Remaining paper
detection in paper re-
feed area
The Duplex Unit Upper Transport Sensor of Duplex Unit Lower
Transport Sensor was ON at turning on of the Main Switch, at
opening and closing of the Duplex Unit Cover, at occurrence of a
paper jam or at stop of paper transport.
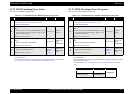
C H E C K
P O I N T
Before replacing any electrical part, check to see if the part in
question is defective or not by consulting “3.5 Troubleshooting for
Electrical Parts”
(p.121). Then replace the part, if necessary.