


EPSON EPL-6200/EPL-6200L Revision A
Disassembly and Assembly Removal and Installation of Major Components 152
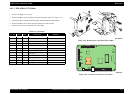
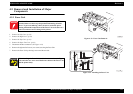
4.5 Removal and Installation of Major
Components
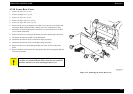
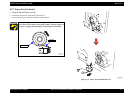
4.5.1 Fuser Unit
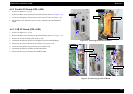
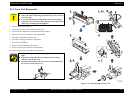
1.
Remove the Left Cover. (p.138)
2.
Remove the Right Cover. (p.139)
3.
Remove the Top Cover. (p.142)
4.
Remove the Paper Exit Cover. (p.143)
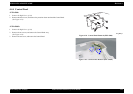
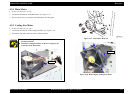
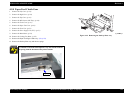
5. Disconnect the three connectors.
(See Figure 4-33)
6. Remove the right and left screws (two screws) securing the Fuser Unit.
7. Remove the Fuser Unit by drawing it out toward the rear side.
Figure 4-33. Fuser Unit Removal
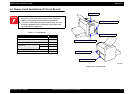
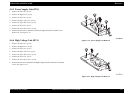
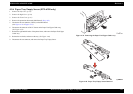
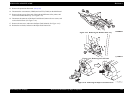
Figure 4-34. Installing the Fuser Unit
W A R N I N G
The Fuser Unit remains at hazardous temperature for a certain
period of time even after stop of operation and turning off of the
power. To prevent suffering a burn, be sure to wait after power
turning off until the temperature of the Fuser Unit cools down to a
safe level, and then start working on the printer.
When installing the Fuser Unit, lead the harness as shown in Figure
4-30, and take care not to catch the harness between the Fuser Unit
and the printer body.