


EPSON EPL-6200/EPL-6200L Revision A
Disassembly and Assembly Consumables and Regular Replacement Parts 135
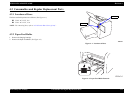
4.2.3 Developer Cartridge / Photoconductor Unit
Replacement
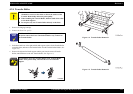
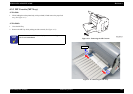
1. Open the Front Cover, and take out the Imaging Cartridge from the printer.
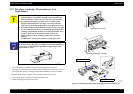
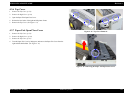
2. Turn the lever of the Developer Cartridge (toner cartridge) in the direction as shown
and separate the Developer Cartridge and the Photoconductor Unit from each other.
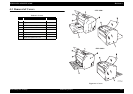
3. Replace the Developer Cartridge or Photoconductor Unit with a new one.
4. Install the Developer Cartridge on the Photoconductor Unit.
5. Install the Imaging Cartridge in the printer.
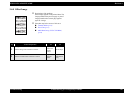
Figure 4-3. Replacing the Developer Cartridge / Photoconductor Unit
C A U T I O N
When you put the Developer Cartridge (toner cartridge) and
Photoconductor Unit (Drum Cartridge) separated from each
other on the floor or table, take care not to let toner fly apart.
If you put the Developer Cartridge (toner cartridge) in an
upright position and shake it strongly, toner may come out.
Take care not to handle the Developer Cartridge in such a way.
If the Photoconductor Unit (Drum Cartridge) is exposed to light
for an extended period of time, it can undergo light fatigue, thus
resulting in degradation of image. To avoid such trouble, when
you have taken out the Imaging Cartridge, protect the
Photoconductor Unit by covering it with a clean cloth for
shading.
In addition, do not this work under any strong light source.
C H E C K
P O I N T
For replacing the Developer Cartridge (toner cartridge), swing
adequately the new Developer Cartridge horizontally beforehand to
stir the toner. (To minimize the possibility of light fatigue of the
Photoconductor Unit.)
Photoconductor Unit
Developer Cartridge
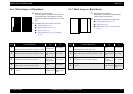
Opening the Front Cover
Removing the Imaging Cartridge