


EPSON EPL-6200/EPL-6200L Revision A
Disassembly and Assembly Consumables and Regular Replacement Parts 136
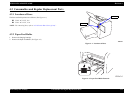
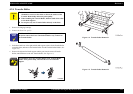
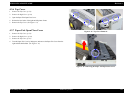
4.2.4 Transfer Roller
1. Remove the Imaging Cartridge.
2.
Remove the Fuser Unit. (p.152)
3. Push down each lever of the right and left shaft supports (white) for the Transfer Roller
toward the front, and remove the Transfer Roller from the Transfer Roller Holder.
(See
Figure 4-4)
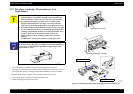
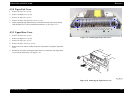
4. Remove the right and left shaft supports and the gear from the removed Transfer
Roller, and install them on the new Transfer Roller.
(See Figure 4-5)
Figure 4-4. Transfer Roller Removal 1
Figure 4-5. Transfer Roller Removal 2
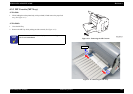
C A U T I O N
Do not touch the surface of the Transfer Roller nor stain it with
chemicals or toner, for the dents or dirt on the surface of the
Transfer Roller badly affects the print quality.
When handling the Transfer Roller, hold the shaft of the roller
or the shaft supports.
Do not place any new Transfer Roller directly on the floor.
C H E C K
P O I N T
The Transfer Roller can be removed singly. However, you are
advised to remove the Fuser Unit beforehand for easy removal of
the Transfer Roller.
In installation, insert the Transfer Roller in the Transfer Roller
Holder of the printer body, and raise the lever of each shaft
support.