


EPSON EPL-6200/EPL-6200L Revision A
Disassembly and Assembly Removal and Installation of Circuit Boards 149
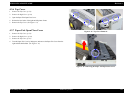
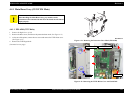
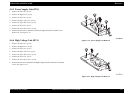
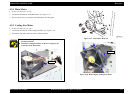
4.4.2 Parallel I/F Board (EPL-6200)
1.
Remove the Right Cover. (p.139)
2. Remove the three screws, and remove the protection sheet metal.
(See Figure 4-21)
3. At the rear of the printer, remove the two screws on the I/F side.
(See Figure 4-27)
4. Disconnect the FFC and remove the two screws, and then remove the Parallel I/F
Board.
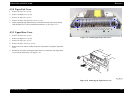
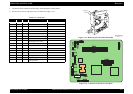
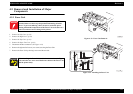
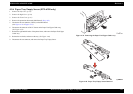
4.4.3 USB I/F Board (EPL-6200)
1.
Remove the Right Cover. (p.139)
2. Remove the three screws, and remove the protection sheet metal.
(See Figure 4-21)
3.
Remove the Parallel I/F Board (EPL-6200). (p.149)
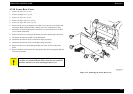
4. Disconnect the connector (CN815) for the Duplex Unit from the Main Board.
5. Remove the two screws, and remove the I/F frame.
(See Figure 4-28)
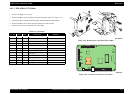
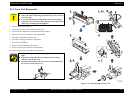
6. At the rear of the printer, remove the one screw on the I/F side.
7. Disconnect the connector (CN404) from the Main Board.
8. Remove the two screws, and remove the USB I/F Board.
Figure 4-27. Removing the Parallel I/F Board
Figure 4-28. Removing the USB I/F Board
Screws x 2
Screws x 2
Connector
Disconnect FFC
Parallel I/F Board
One screw
Screws x 2
I/F Frame
Screws x 2
USB IF Board