Chapter 6 Replacement of CPU/Memory Board Unit (CMU), CPU, and DIMM 6-15
6. Ensure that the metallic underside of the wrist strap is in direct contact with
your skin. The wrist strap should be snug around the wrist so that it does not
rotate. See Section 1.4, “Antistatic Precautions” on page 1-6.
Caution – Before handling FRUs, be sure to connect the clip of the antistatic wrist
strap and of the antistatic mat to the server grounding port, and attach the band of
the wrist strap to one of your wrists. Place the FRUs on the grounded antistatic mat.
Failure to take these antistatic measures might result in serious damage.
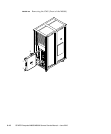
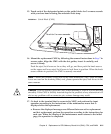
7. Remove the CMU to be replaced.
a. Using a Phillips screwdriver, turn the knob screws securing the upper and
lower eject/lock levers 90 to 180 degrees to unlock the levers. (Turn the knob
screw while lightly pulling the lever by one hand.)
b. Unlock the eject/lock levers to pull the CMU off the backplane.
c. While grasping the handle at the front of the CMU, pull the CMU out
partially until the [NEAR TO END] label comes into view.
d. Raise the handle at the upper part of the CMU.
e. While grasping the front and upper handles of the CMU, pull it out slowly
from the slot.
Note – To upgrade the CMU, remove the dummy (filler) unit before mounting the
CMU to be added. Since the same levers are used on the dummy (filler) unit, please
operate the eject/lock levers in the same manner.
Caution – A CMU with mounted components in the maximum configuration
weighs about 22 kg.


