


Replacing or adding drives 25
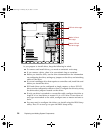
Drive cabling information
Your system includes three different types of drive cables. Each drive cable is
clearly labeled, indicating cable-type and showing which end is connected to
the appropriate connector on the system board and which end is connected
to the drive.
Use the diskette drive connector cable to connect the diskette drive. Use the
standard IDE connector cable to connect IDE devices such as CD drives and
standard IDE hard drives. Use the SCSI LVD cable to connect LVD-compatible
SCSI devices. A terminator comes installed on this cable.
You can also obtain two optional cables for your system. The IDE DMA-66
cable is used to connect DMA-66-compatible hard drives, and the SCSI SE cable
is used to connect single-ended SCSI devices and requires termination, either
on the device or as a plug-in terminator on the cable.
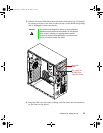
3.5-inch diskette or CD drives
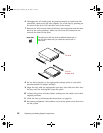
Both the 3.5-inch diskette drive and 5.25-inch CD drives are secured in the
chassis by removable rails. The rails let the drives slide into and out of the
guides in the front bays. Extra rails are included with your system and are
clipped to the outsides of the drive cages, inside the case.
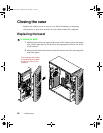
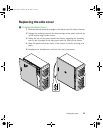
Replacing the 3.5-inch diskette or CD drive
To replace the drives:
1 Turn off the system and disconnect the power cord, modem cord (if
installed), and all external peripheral devices.
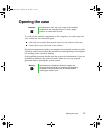
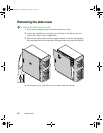
2 Remove the left side cover panel. (See “Removing the side cover” on
page 18 and “Preventing static electricity discharge” on page 15.)
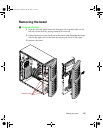
3 Remove the bezel. (See “To remove the bezel:” on page 19.)
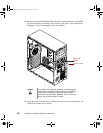
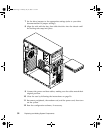
4 Locate the 3.5-inch diskette or 5.25-inch CD drive you want to replace.
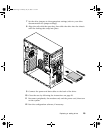
5 Remove the power and data cables from the back of the drive, noting
their locations and orientations. (You will reconnect these cables after you
install the new drive.)
05032.book Page 25 Monday, July 10, 2000 11:43 AM