


3/27/97 10:43 am Final version given to printer
...............................................................................................................
1-5
HP Company Confidential
1. Setting Up
●
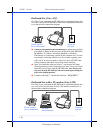
Remove the black print cartridge from its packaging.
Holding the blue top of the cartridge, gently remove
both pieces of tape - clear blue and solid white -
covering the ink nozzles and vent hole. (If you don’t
remove the white tape, the ink cartridge will be
depleted prematurely.)
Be careful not to touch the ink nozzles or the copper
contacts; fingerprints may damage them.
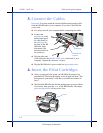
●
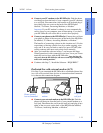
Next, place the
black print cartridge
into the left
cartridge holder as
shown:
1) First slide in the
bottom until it
clicks into place.
2) Then push the
top forward until
the cartridge snaps
into place.
●
Remove the color print cartridge box from its packaging. Peel off
the clear blue tape covering the ink nozzles, then place the color
print cartridge into the right cartridge holder and push it forward
until it snaps into place. Again, try not to touch the ink nozzles or
copper contacts.
●
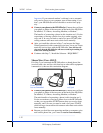
Close the HP OfficeJet’s cover.
Note: If the print cartridge holder moves out of sight before you finish
inserting both print cartridges, close the cover all the way, then open
it again; the holder will come back into view. To prevent ink drying
and clogging the nozzles, the holder will return to the parked position
after a few minutes.