


3/27/97 11:10 am Final version given to printer
...............................................................................................................
3-25
HP Company Confidential
3. Faxing
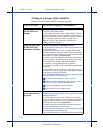
To update your fax receive settings in the software:
Double-click
HP OfficeJet Manager
on your Windows desktop.
Click
HP OfficeJet
and select
Fax Setup Wizard
.
Follow the instructions in all of the Fax Setup Wizard screens,
updating where appropriate.
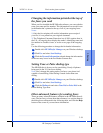
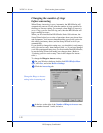
Changing the paper size setting
When you load a different paper size in the HP OfficeJet’s paper sup-
ply tray, you also need to change the paper size in the Fax Receive
settings if you’ll be receiving faxes on the new paper.
The factory-set paper size to print faxes on is Letter (8.5 x 11 inches).
You can also print faxes on Legal-size paper (8.5 x 14 inches) or on
A4-size paper (210 x 297 mm).
On your Windows desktop, double-click on
HP OfficeJet Man-
ager
, then click
Fax
and select
Receive Settings
.
Select a new paper size in the
Load Paper Size
area.
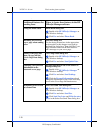
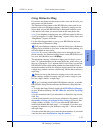
Other advanced features for receiving faxes
There are many advanced features available in the HP OfficeJet soft-
ware. The best way to learn about these features is to explore them by
clicking the tabs in the Receive Fax Settings dialog box. Click the
Help
button in each of the tabs for more information about the fea-
tures and settings.
•
To locate the Receive Fax Settings dialog box, double-click on
HP
OfficeJet Manager
on your Windows desktop, click
Fax
, and select
Receive Settings
.
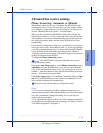
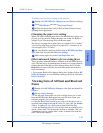
Viewing Lists of All Sent and Received
Faxes
Double-click
HP OfficeJet Manager
, click
Fax
, and select
Fax
History
.
Do any of the following:
a) Click the
Sent Faxes
tab to see a list of all the faxes you’ve sent
from the HP OfficeJet. Both paper faxes and PC faxes (from your
software program) you’ve sent are included.
b) Click the
Received Faxes
tab to see a list of all the faxes you’ve
received, both printed faxes and PC faxes. To view a PC fax,
double-
click
it. To print a PC fax,
click it once
, then click
Print Fax
.
c) Click the
Pending
tab to see a list of faxes that are scheduled to be
sent at a future time. (For instructions on how to schedule a fax, see
“Scheduling a fax for a future time” under “Advanced fax send fea-
tures” later in this chapter.)
1
2
3
1
2
1
2