


Scanning_ 3
3.Press the up/down arrow until the option you want highlights and press
OK.
4.Press the up/down arrow to highlight All and press OK.
5.Pre
ss the up/down arrow until the name and address you want is
highlighted. You can search upwards or downwards through the
entire memory in index (numerical) order.
Searching with a particular first letter
1.Press (Scan/Email) and Address Book on the control panel.
2.Pre
ss the up/down arrow to highlight Search & Dial and press OK.
3.Pre
ss the up/down arrow until the option you want is highlighted and
press OK.
4.Pre
ss the up/down arrow to highlight ID and press OK.
5.Ente
r the first few letters of the name you want.
6.Pre
ss the up/down arrow until the name you want is highlighted and
press OK.
Printing Address Book
You can check your Address Book information by printing a list.
1.Press (Scan/Email) and Address Book on the control panel.
2.Pre
ss the up/down arrow to highlight Print and press OK.
3.Pre
ss the up/down arrow until the option you want is highlighted and
press OK.
Your Address Book information prints out.
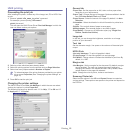
Scanning originals and sending to your
computer (Scan to PC)
You can scan an image on the machine via the Samsung Scan and Fax
Manager program that is installed in your networked computer.
For USB connected machine
This is a basic scanning method for usb connected machine.
1. Ma
ke sure that the machine is connected to your computer and powered
on.
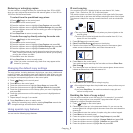
2. Loa
d originals face up into the document feeder, or place a single
original face down on the scanner glass
(See "Loading originals" on page 1).
3. Pr
ess (Scan/Email) on the control panel.
4. Pre
ss the up/down arrow to highlight Scan To PC and press OK.
5. Pre
ss the up/down arrow to highlight Local PC and press OK.
If you see Not Available message, check the port connection.
6. Pre
ss the up/down arrow until the application program you want is
highlighted and press OK.
Default setting is My
Documents.
To add or delete the folder where the scanned file is saved, add or
delete the application program in Samsung Scan and Fax
Manager > Properties > Set Scan Button.
7. Pre
ss the up/down arrow until the setting you want is highlighted and
press OK.
•Re
solution: Sets the image resolution.
•Scan
Color: Sets the color mode.
•Sca
n Format: Sets the file format in which the image is to be saved.
•Scan Size: Sets
the image size.
•Scan Format appears only when you selected the Scan
destination to My Documents.
•If you want to scan from the default setting, press Start.
8. Sca
nning begins.
•Scanned image is saved in computer’s My Documents > My
Pictures > Samsung folder.
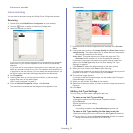
•You can use Twain driver to scan quickly in Samsung Scan and
Fax Manager program.
•You can also scan by pressing Window’s Start > Control Panel >
Samsung Scan and Fax Manager > Quick Scan.
For network connected machine
Make sure the scanner printer driver is installed on your computer using the
software CD, since the printer driver includes the scan program it does not
need to be installed separartely in most cases (See "Installing network
connected machine’s driver" on page 3).
1. Make sure that your machine and the computer are connected to a
network and Samsung Scan and Fax Manager is installed on the
computer.
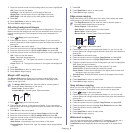
2. L
oad originals face up into the document feeder, or place a single
original face down on the scanner glass.
3. Press (Scan/Email) on the control panel.
4. Pre
ss the up/down arrow to highlight Scan To PC and press OK.
5. Pre
ss the up/down arrow to highlight Network PC and press OK.
If you see Not Available message, check the port connection.
6. Se
lect your registered computer ID, and enter the Password if
necessary.
•ID is the same ID as the registered Computer ID for Samsung
Scan and Fax Manager.
•Pass
word is the 4 digit number registered Password for
Samsung Scan and Fax Manager.
7. Press the up/down arrow until the application program you want
highlights and press OK.
Default setting is My Document
s.
To add or delete the folder where the scanned file is saved, add or
delete the application program in Samsung Scan and Fax
Manager > Properties > Set Scan Button.
8. Pre
ss the up/down arrow until the setting you want is highlighted and
press OK.
•Resolution: Sets the image resolution.
•Scan
Color: Sets the color mode.
•Scan
Format: Sets the file format in which the image is to be saved.
•Scan
Size: Sets the image size.
•Scan Format appears only when you selected the Scan
destination to My Documents.
•If you want to scan from the default setting, press Start.
9. Sca
nning begins.
•Scanned image is saved in computer’s My Documents > My
Pictures > Samsung folder.
•You can use Twain driver to scan quickly in using the Samsung
Scan and Fax Manager program.
•You can also scan by pressing Window’s Start > Control Panel >