


Sample Configurations 261
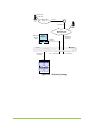
STEP 1. ATTACH AND VIEW STORAGE DEVICES
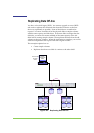
Attach the legacy JBOD to the V-Switch and configure the storage port
communications as needed. See “Configuring the Storage Ports,” page 57.
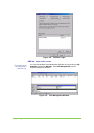
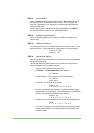
Use the CLI command storage show to view the attached storage.
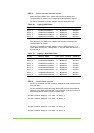
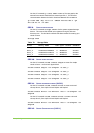
Table 69: Legacy JBOD Disks
Alias Entity Name LUN Oper. Status Subdisk
Stor_1 200507606058c90 0 Enabled entire
Stor_2 2000002037f88fb8 0 Enabled entire
Stor_3 2000002037c32b1f 0 Enabled entire
Stor_4 2000002037c32450 0 Enabled entire
Next, attach the new JBOD to the V-Switch and configure the storage port
communications as needed.
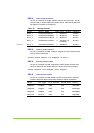
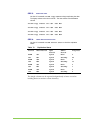
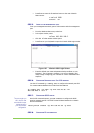
Use the CLI command storage show to view the attached storage. The
legacy JBOD disks are Stor_1 through Stor_4. The new JBOD disks are Stor_5
through Stor_8.
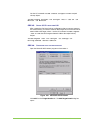
Table 70: Legacy + New JBOD Disks
Alias Entity Name LUN Oper. Status Subdisk
Stor_1 200507606058c90 0 Enabled entire
Stor_2 2000002037f88fb8 0 Enabled entire
Stor_3 2000002037c32b1f 0 Enabled entire
Stor_4 2000002037c32450 0 Enabled entire
Stor_5 500708206059f880 0 Enabled entire
Stor_6 500003504206a683 0 Enabled entire
Stor_7 500065470490f321 0 Enabled entire
Stor_8 500000024364h764 0 Enabled entire
STEP 2. CREATE SIMPLE VOLUMES
Use the CLI command volume create simple to create a simple volume
from each disk.
Use one standard for naming the legacy JBOD simple volumes and another for
naming the new JBOD simple volumes. This will provide a visual cue when it is
time to designate the source volume to replicate from.
volume create simple –vol OS1 –d Stor_1
volume create simple –vol OS2 –d Stor_2
. . .
volume create simple –vol NS3 –d Stor_7
volume create simple –vol NS4 –d Stor_8