


Adjustment Procedures
5–8
TDS 684A, TDS 744A, & TDS 784A Service Manual
2. Install the software to hard disk:
a. Install your working disk in a floppy drive and type install. The software
will ask you to specify the hard disk on which to install the adjustment
software. It will also prompt you to specify several GPIB-card configura-
tion parameters.
b. The adjustment software will be installed in a directory called
TDS684.ADJ or TDS700.ADJ on your hard drive.
3. Store your installation disk: Remove your installation disk and store in a
secure place.
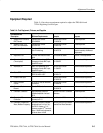
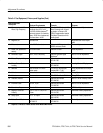
Equipment
Required
All items that are listed for “Software-based Adjustments” under
“Purpose” in Table 5–4 starting on page 5–5.
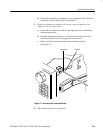
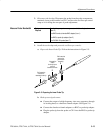
1. Hook up the oscilloscope:
a. Connect the GPIB cable (Item 7) to the GPIB port at the computer rear
panel. (When multiple GPIB cards are installed, connect to the GPIB0
card.)
b. Connect the GPIB cable (Item 7) to the GPIB port at the oscilloscope
rear panel.
c. Power on the oscilloscope.
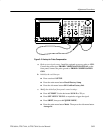
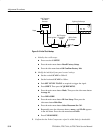
2. Set up the oscilloscope:
a. Press SHIFT; then press UTILITY.
b. Repeatedly press the main-menu button System until I/O is highlighted
in the pop-up menu.
c. Press the side-menu button TALK/LISTEN.
d. Use the keypad to set any address between 0 and 29.
3. Let the oscilloscope warm up: Allow a 20 minute warm-up period before
you begin step 4.
4. Start the adjustment software:
a. Change drives to your hard drive.
b. Change directories to TDS684A.ADJ for the TDS 684A or TDS700.ADJ
for the TDS 744A or TDS 784A.
c. Type ADJ684A for the TDS 684A or type ADJ700 for the TDS 744A
and TDS 784A.
Software-Based
Adjustments