


16
ICC
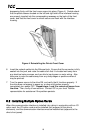
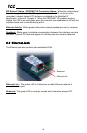
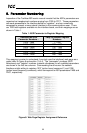
depressing firmly until the front cover snaps into place (Figure 4). Double-check
that the plastic bosses located on the left and right side of the interface housing
are properly inserted into the corresponding recesses on the back of the front
cover, and that the front cover is overall secure and flush with the interface
housing.
Figure 4: Reinstalling the Drive's Front Cover
6. Insert the network cable into the Ethernet jack. Ensure that the connector is fully
seated into the jack, and route the cable such that it is located well away from
any electrical noise sources, such as drive’s input power or motor wiring. Also
take care to route the cable away from any sharp edges or positions where it
may be pinched.
7. Turn the power source to the drive ON, and verify that it functions properly. If
the drive does not appear to power up, or does not function properly,
immediately turn power OFF. Repeat steps 1 and 2 to remove all power from
the drive. Then, verify all connections. Contact ICC or your local Toshiba
representative for assistance if the problem persists.
5.2 Installing Multiple Option Cards
When this communication interface is installed into a drive in conjunction with an I/O
option card, the I/O option card must be installed first (adjacent to the drive’s
enclosure), and the communication interface must be installed last (adjacent to the
drive’s front panel).