


2
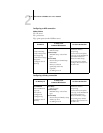
2-13 GA-1120 on a NetWare 4.x or 5.x network
Setting up a NetWare print queue for bindery
For NetWare 3.x and for NetWare 4.x in emulation mode, the NetWare print server and
print queue for the GA-1120 are created and configured from NetWare Print Console
(PCONSOLE), a NetWare utility that is stored in the NetWare PUBLIC directory.
As with NDS, you can create several NetWare entities on a Novell server, and then you
can select them in Network Setup (see page 4-21).
Setting up NetWare Windows clients for printing
Before setting up client workstations for printing, perform Network Setup (see
page 4-12), and verify that the settings reflect the entities you created in the NetWare
administrator utilities (see page 2-10).
NOTE: For printing to the GA-1120, connect all Windows clients to a NetWare server
and permit them to connect to the Netware print server or servers on which you
defined a NetWare print queue for the GA-1120.
After the Novell server and the GA-1120 have been set up, client setup consists of:
•Installing the networking protocol, binding it to the network adapter card, and
permitting the client to log in to the NetWare file server.
On Windows 9x/Me workstations, load both the IPX/SPX-compatible protocol and
the Client for NetWare Networks from the Network Control Panel.
On Windows NT 4.0/2000/XP workstations, install Client Services for NetWare.
Use the CSNW option in the Control Panel to set printing options and specify a
preferred NetWare server.
•Setting up the GA-1120 as a PostScript printer by installing a PostScript printer
driver and the GA-1120 PPD (PostScript printer description).
•Adding a network port and connecting the workstation to one or more NetWare
queues that have been defined for the GA-1120.
•Installing GA-1120 software, such as color reference files.
For details, see the User Software Installation Guide.