


3
3-9 About Setup
NOTE: You must configure the GA-1120 with the correct Windows NT/2000 domain
name. This is especially important for Windows printing, also known as SMB
printing.
NOTE: The GA-1120 does not support the Windows 2000 Active Directory Service.
When you use the GA-1120 in a Windows 2000 server environment, assign the
GA-1120 to a Domain or Workgroup.
Ensuring the copier connection
Complete the following steps before you configure the GA-1120 and the workstations
that will print to the GA-1120. A service technician will have performed some initial
installation.
TO PREPARE FOR GA-1120 CONFIGURATION
1. Print a copier test page to verify the copier is functioning normally.
2. Turn off the copier and connect the interface cable from the copier to the GA-1120.
3. To confirm this connection, turn on the copier and the GA-1120, and print a Test Page
from the GA-1120 Control Panel.
To print a Test Page, press the Menu button on the Control Panel to display the
Functions menu. Choose Print Pages, and then choose Test Page.
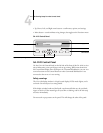
4. With both the copier and the GA-1120 turned off, connect the network cable to the
GA-1120, as described in Chapter 1.
The network should already be installed and operational.
5. Turn on the copier and then the GA-1120.
Proceed to GA-1120 Setup, described in Chapter 4.