975-0200-01-01 xvii
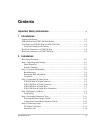
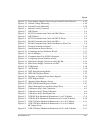
Figure 1-1 Front Panel: XTR 850 Watt and XTR 1700 Watt - - - - - - - - - - - - - - - - - 1–4
Figure 1-2 Front Panel Display and Controls- - - - - - - - - - - - - - - - - - - - - - - - - - - - 1–5
Figure 1-3 XTR 850 Watt Series: 6 V to 40 V Models - - - - - - - - - - - - - - - - - - - - - 1–6
Figure 1-4 XTR 850 Watt Series: 60 V to 150 V Models- - - - - - - - - - - - - - - - - - - - 1–6
Figure 1-5 XTR 850 Watt Series: 300 V to 600 V Models- - - - - - - - - - - - - - - - - - - 1–6
Figure 1-6 XTR 1700 Watt Series: 6 V to 40 V Models - - - - - - - - - - - - - - - - - - - - 1–8
Figure 1-7 XTR 1700 Watt Series: 60 V to 600 V Models- - - - - - - - - - - - - - - - - - - 1–8
Figure 2-1 XTR 1700 Watt AC Input Cover and Strain Relief - - - - - - - - - - - - - - - - 2–6
Figure 2-2 Maximum Load Wire Length for 1 V Line Drop- - - - - - - - - - - - - - - - - 2–10
Figure 2-3 Connecting Single Loads - - - - - - - - - - - - - - - - - - - - - - - - - - - - - - - - 2–14
Figure 2-4 Remote Sense Connection- - - - - - - - - - - - - - - - - - - - - - - - - - - - - - - - 2–16
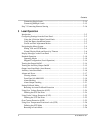
Figure 3-1 9 Position Mode Control Knob - - - - - - - - - - - - - - - - - - - - - - - - - - - - - 3–2
Figure 3-2 Front Panel Menu System - - - - - - - - - - - - - - - - - - - - - - - - - - - - - - - - - 3–7
Figure 3-3 Operating Modes - - - - - - - - - - - - - - - - - - - - - - - - - - - - - - - - - - - - - - 3–12
Figure 3-4 Split Supply Operation - - - - - - - - - - - - - - - - - - - - - - - - - - - - - - - - - - 3–38
Figure 3-5 Series Operation - - - - - - - - - - - - - - - - - - - - - - - - - - - - - - - - - - - - - - 3–39
Figure 3-6 Load Connections in Remote Sensing Mode - - - - - - - - - - - - - - - - - - - 3–40
Figure 3-7 Load Connections in Local Sensing Mode - - - - - - - - - - - - - - - - - - - - - 3–43
Figure 3-8 Load Connections in Remote Sensing Mode (Parallel Control Method) - 3–44
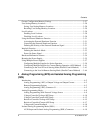
Figure 4-1 APG Connector Terminals - - - - - - - - - - - - - - - - - - - - - - - - - - - - - - - - 4–5
Figure 4-2 Inserting Screwdriver into Spring Terminal Block - - - - - - - - - - - - - - - - 4–7
Figure 4-3 APG and DC Output Connector - - - - - - - - - - - - - - - - - - - - - - - - - - - - - 4–7
Figure 4-4 Programming Output Voltage using an External Voltage Source- - - - - - - 4–9
Figure 4-5 Programming Output Current using an External Voltage Source - - - - - - - 4–9
Figure 4-6 Programming Output Voltage using an External Resistor- - - - - - - - - - - 4–14
Figure 4-7 Programming Output Current using an External Resistor - - - - - - - - - - - 4–14
Figure 4-8 Voltage Readback Using APG Connector J1 - - - - - - - - - - - - - - - - - - - 4–18
Figure 4-9 Current Readback Using APG Connector J1 - - - - - - - - - - - - - - - - - - - 4–18
Figure 4-10 AUX Output and ISOL Connector Pinout - - - - - - - - - - - - - - - - - - - - - 4–19
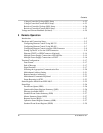
Figure 4-11 Programming Output Voltage using an Isolated External Voltage Source 4–21
Figure 4-12 Programming Output Current using an Isolated External Voltage Source 4–21
Figure 4-13 Programming Output Voltage using an Isolated External Resistor - - - - - 4–25
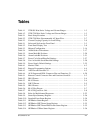
Figures


