


Scanning
WorkCentre 7755/7765/7775 Multifunction Printer
User Guide
115
Retrieving Scan Files to Your Computer Using CentreWare IS
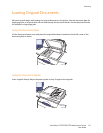
Scanned files are retrieved by copying them from the printer to your computer’s hard drive.
1. At your computer, launch your Web browser.
2. Type the printer’s IP address into the Web browser’s address bar, then press Enter to open
CentreWare IS.
Note: If you don’t know your printer’s IP address, see Finding The Printer’s IP Address on page 38.
3. Click the Scan tab.
4. In the Display section, click the Mailboxes button.
5. In the Scan to Mailbox section, click Default Public Folder. The Folder Contents window contains
your image file.
Note: If your image file is not displayed, click Update View.
6. In the Action section, select one of the following options, then click the Go button:
• Download: saves a copy of the file to your computer. When prompted, click Save, then choose
where you wish the file to be saved on your computer. You can then open the file or close the
dialog box.
• Reprint: prints the file on the printer without saving a copy of the file to your computer.
• Delete: deletes the file from the mailbox. When prompted, click OK to delete the file or Cancel:
cancel the operation.
Using a Private Folder
Your system administrator may have created private folders on the printer. A private folder may require
the use of a password. After selecting the private folder, touch Enter Password for Folder, then enter
the password for the folder using the touch screen keyboard.
You can use CentreWare IS to create a private folder yourself using the following procedure.
Creating a Private Folder
1. Launch your Web browser.
2. Type the printer’s IP address into the Web browser’s address bar, then press Enter to open
CentreWare IS.
Note: If you don’t know your printer’s IP address, see Finding The Printer’s IP Address on page 38.
3. Click the Scan tab.
4. In the Display section, click the Mailboxes button.
5. In the Scan to Mailbox section, click Create Folder.
6. Enter a name for the folder and, if desired, create a password.
7. Click the Apply button.
Your private folder is now available for use, and will appear in the folder list in CentreWare IS and on
the printer’s touch screen under Local Templates, indicating that its contents will be stored locally on
the printer’s hard drive.