


Scanning
WorkCentre 7755/7765/7775 Multifunction Printer
User Guide
117
Scan to an Email Address
Scanning to an email address is a feature of Workflow Scanning. Scanned documents are sent as
attachments to email.
Note: Scanning to an email address must be enabled by your system administrator.
To send a scanned image to an email address:
1. On the printer’s control panel, press the Services Home button.
2. Touch the E-Mail icon.
3. To change the From… address, touch From…
Note: The From… address was configured by your system administrator. You may or may not be
able to change the From… address.
Enter the email address using the touch screen keyboard, then touch Save.
4. Touch New Recipient.
You can enter the full email address using the touch screen keyboard or by getting the email
address from the Address Book. Enter the recipient name or part of the name, depending on how
the address book is set up, then touch Search.
5. Touch Add to add the recipient to the list.
6. Repeat steps 4 to 5 to add additional recipients to the list. When all recipients have been added to
the list, touch Close.
7. A default subject is provided for the email. To change the subject, touch Subject, then enter the
new subject using the touch screen keyboard. When finished, touch Save.
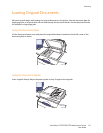
8. Place the document original in the document feeder or on the document glass, then press the
green Start button.
To send a scanned image to an email address in the Address Book:
1. On the printer’s control panel, press the Services Home button.
2. Touch E-mail.
3. Touch Address Book.
4. Touch Public in the Address Book’s drop-down list.
5. Enter the name of the recipient of your email.
6. Touch Search.
7. The public address book searches for the name and displays a list. Select the name from the list.
8. Touch To:, then touch Close.
9. Place the document to email in the document feeder or on the document glass, then press the
green Start button.
If desired, use the four buttons at the bottom of the touch screen: Output Color, 2-Sided
Scanning, Original Type and Scan Presets, to select the desired options for the scan.
See also:
Setting Scan Options on page 132