


2–7
USER GUIDE (PRINT)
5 Insert the CD-ROM in the CD-ROM drive.
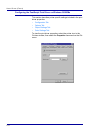
6 When the Manufacturers and Printers window displays, select
Have Disk…. The Install From Disk screen is displayed.
7 Enter the path for your driver files in the “Copy manufacturer’s files
from:” box.
NOTE: You can also use the Browse button to specify a folder on
the CD-ROM.
8 Select OK on the Install From Disk or Open screen.
9 Select your printer model from the Printers list and select Next.
10 Select the port that you are using from the Available ports list, then
select Next.
11 When prompted, accept the default printer name, or give your
printer a more descriptive name.
12 Select either Yes or No to make this printer your default Windows
printer. Choose Yes if you will be printing primarily to this printer
from your Windows applications. Select Next.
13 Print a Test Page.
14 Verify that the test page prints at the printer, then select Finish.
15 Read the End User License Agreement and select Accept.
16 Confirm that the printer has been added in the Printers window.
17 Continue to the next page in order to configure the print driver to
complete the installation.