


Chapter 10: File Downloads and Uploads
194 Section II: Advanced Operations
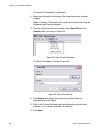
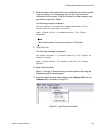
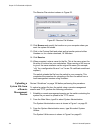
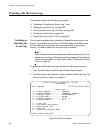
The Receive File window is shown in Figure 62.
Figure 62. Receive File Window
12. Click Browse and specify the location on your computer where you
want the system file stored.
13. Click in the Protocol field and select as the transfer protocol either
Xmodem or, for a faster download, 1K XModem.
14. Click Receive.
15. When prompted, enter a name for the file. This is the name given the
file when it is stored on your workstation. When naming a file, be sure
to give it the same extension as the original file name (for example,
“.cfg” for a configuration file and “.csr” for an CA certificate enrollment
request.)
The switch uploads the file from the switch to your computer. This
completes the procedure for uploading a file from the switch from a
local management session using Xmodem.
Uploading a
System File from
a Remote
Management
Session
Review “Guidelines” on page 190 before performing this procedure.
To upload a system file from the switch using a remote management
session and TFTP, perform the following procedure:
1. Establish a remote management session on the switch containing the
system file you want to upload to the TFTP server.
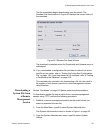
2. From the Main Menu, type 5 to select System Administration.
The System Administration menu is shown in Figure 1 on page 32.
3. From the System Administration menu, type 9 to select System
Utilities.
The System Utilities menu is shown in Figure 6 on page 43.