


7-2 About Objects
About Objects
Before you begin this chapter, it’s important to understand the term
objects.
When you create a label, you build it by creating or adding objects to it.
The objects can be made either for printing or for cutting out (if you have
the Color & Cut system).
It may be useful to think of objects as “containers” that can hold various
types of content or data. You decide where to put an object and what to
put in the container when you create your labels. Once you have “filled”
an object, it is named for its contents, so it is called a text object, a
graphic object, a bar code object, and so on.
The object types you can add to labels in this system are:
Text objects
Variable text objects
Graphic objects
Bar code objects
HotShape objects
A single label can include multiple objects, such as graphics and
variable text, or text and bar codes. (For an example of a label that
contains multiple objects, see Figure 4-1 on page 4-2. The label pictured
contains a graphic and a block of text.)
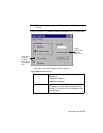
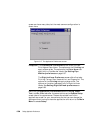
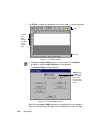
The system displays the objects on the Editor window, within the
preview area. The Editor window is ready to display the label as you
create it. At this point, the system operates with these defaults:
The blank label displayed reflects the size and color of the tape
installed.
The blank label displays with landscape print orientation assumed.
The magnification or zoom level is set to display 12 inches of label
length, but this does not reflect the actual printable length of the
label. The objects you insert determine the final length of the label,
or, if you have a paneled ribbon installed, the length of the panel
determines the maximum length of the label. See Checking Length
on page 11-12 for more information.