


10-8 Creating Cut Out Objects
• Sequence to create Sequential labels, with variable text objects
consisting of increasing or decreasing numbers or alphabetic
letters. Refer to Creating sequential labels on page 7-13.
• Text list to create Text list labels, with variable text objects
consisting of a list of items you create. Refer to Creating text list
labels on page 7-16.
3. When the creation sequence is complete and you are back in the
Editor window, choose Print to process the labels and cut out the
variable text objects.
Cutting out graphic objects
Not all graphic objects may be specified as cut out objects. The system
offers only graphics suitable for cutting out when you choose the
Graphics button on the Insert Object screen, and does not allow you
to specify a graphic object as a cut out object if it is not suitable for
cutting out.
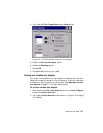
To cut out graphic objects
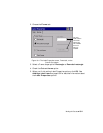
1. After selecting the Cut out object option on the Insert Objects
screen, choose Graphic.
2. You’ll see the Graphics Categories screen (shown in Figure 7-12 on
page 7-22). Select a category and choose OK.
3. You’ll see the Graphics screen (shown in Figure 7-13 on page 7-22.)
Select a graphic and choose OK.
4. When the creation sequence is complete, choose <Print>, which
processes the labels and cuts out the graphic objects.
Cutting out HotShape objects
HotShapes are especially suited for cutting out. You can cut out stars,
circles, arrows, and other shapes. See Adding HotShapes on page 7-23
for information about the HotShapes available on your system.
To cut out HotShapes
1. After selecting the Cut out object option on the Insert Objects
screen (Figure 10-1 on page 10-4), choose HotShapes.
2. You’ll see the HotShapes screen. Select the HotShape object you
want to add as a cut out.