


9-2
Configuration Guide for Cisco Secure ACS 4.2
OL-14390-02
Chapter 9 NAC Configuration Scenario
Step 2: Perform Network Configuration Tasks
To install ACS:
Step 1 Start the ACS installation:
If you are installing ACS for Windows:
a. Using a local administrator account, log in to the computer on which you want to install ACS.
b. Insert the ACS CD into a CD-ROM drive on the computer.
c. If the CD-ROM drive supports the Windows autorun feature, the ACS for Windows dialog box
appears; otherwise, run setup.exe, located in the root directory of the ACS CD.
d. In the Cisco Secure ACS for Windows dialog box, click Install.
If you are installing ACS SE, follow the instructions in the Installation Guide for Cisco Secure ACS
Solution Engine 4.2. Chapter 2, “Installing and Configuring Cisco Secure ACS Solution Engine 4.2,”
provides detailed installation instructions.
During the installation process, you are prompted to enter a password for encrypting the
internal
database.
Step 2 Enter a password that is at least 8 characters long, and contains letters and numbers.
The ACS installation process for ACS for Windows automatically creates a shortcut to the ACS
administrative GUI on your desktop.
Step 3 Double-click the icon to open a browser window to the ACS administrative GUI.
Step 4 If you do not see the icon on the desktop, open your browser from the machine on which you installed
ACS and go to one of these addresses:
• http://IP_address:2002
• http://hostname:2002
where IP_address is the IP address of the host that is running ACS and hostname is the hostname of the
host that is running ACS.
Step 2: Perform Network Configuration Tasks
This section describes:
• Configure a RADIUS AAA Client, page 9-2
• Configure the AAA Server, page 9-4
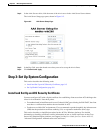
Configure a RADIUS AAA Client
Before you can configure NAC support, you must configure a RADIUS AAA client.
To configure a RADIUS AAA client:
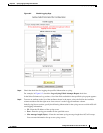
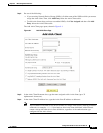
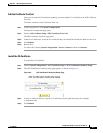
Step 1 In the navigation bar, click Network Configuration.
The Network Configuration page opens.