


5-4
Cisco MGX 8850 Multiservice Switch Installation and Configuration
Release 1.1.31, Part Number 78-11223-03 Rev. B0, May 2005
Chapter 5 Configuring the MGX 8850 Shelf
Initial Shelf Bring-Up
Bringing Up a PXM1 with No Runtime Firmware
This section describes the tasks for loading runtime firmware onto a PXM1 that has only a boot loader.
If the PXM1 already has a runtime firmware image, see the “Configuring Node-Level Parameters”
section on page 5-6.
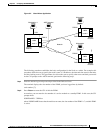
Step 1 Establish communication with the shelf by doing one of the following:
• If you are using an ASCII terminal connected to the control port, the command prompt is present
upon power-up (if the display is skewed, make sure the terminal speed and PXM1-UI port speeds
are the same).
• If you are using a utility such as Hyper Terminal on a PC, the firmware may reside on either a floppy
or the hard drive.
Step 2 Enter the bootChange command to configure boot-level IP parameters.
If the shelf has a redundant PXM1,enter bootChange on each PXM1 to configure unique, boot-level IP
addresses.
Note During the subsequent shelf-level configuration, you must configure another Ethernet IP
address that applies to both PXM1s.
The following parameters are the only ones that are meaningful at this point. Press Enter for other
parameters:
• Mandatory “host name” is a name for the workstation. For the MGX 8850 node, enter the letter “c.”
• Ethernet IP address and subnet mask for the PXM1 LAN port are mandatory (see “inet on Ethernet”
in the following example). Follow the IP address with a colon and a net mask. The netmask is eight
hexadecimal numbers with no embedded periods. Do not type spaces on either side of the colon.
• If the workstation from which you download firmware is on a subnet other than the subnet of the
PXM1, enter a gateway IP address (“gateway inet”).
There are three editing functions near the top of the following example screen. These are ‘clear field’,
go to previous field’, and ‘quit’. Of these, typing a period to clear the current field is the most commonly
used.
>bootChange
'.' = clear field; '-' = go to previous field; ^D = quit
boot device : lnPci
processor number : 0
host name :c
file name :
inet on ethernet (e) : 188.29.37.14:ffffff00
inet on backplane (b):
host inet (h) :
gateway inet (g) : 188.29.37.1
user (u) :
ftp password (pw) (blank = use rsh):
flags (f) : 0x0
target name (tn) :
startup script (s) :
other (o) :
The PXM1 now has a boot-level IP address. Remember to repeat the bootChange command on the
redundant PXM1, if one is installed.
Step 3 Enter reboot to reset the PXM1.