


4-51
Cisco CRS-1 Carrier Routing System 8-Slot Line Card Chassis Installation Guide
OL-6256-08
Chapter 4 Installing and Removing MSCs, PLIMs, and Associated Components
How to Install or Remove a Physical Layer Interface Module (PLIM)
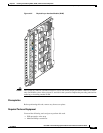
You can install a PLIM in any slot not occupied by an RP card. If you install a new MSC or PLIM,
remove the impedance carrier card from the available slot.
Caution The system may indicate a hardware failure if you do not follow proper procedures. Remove or install
only one PLIM at a time. Allow at least 15
seconds for the system to complete the preceding tasks before
removing or installing another PLIM.
Note We strongly recommend that you use the shutdown command before removing a PLIM to prevent
anomalies when you reinstall a new or reconfigured PLIM.
Prerequisites
Before performing this task, remove any front cover plates.
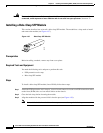
Required Tools and Equipment
You need the following tools to perform this task:
• ESD-preventive wrist strap
• Medium Phillips screwdriver
Steps
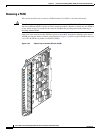
To remove a PLIM, follow these steps:
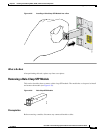
Step 1 Attach the ESD-preventive wrist strap to your wrist and connect its leash to an ESD connection socket
on the front (PLIM) side or a bare metal surface on the chassis.
Step 2 Identify the card to be replaced.
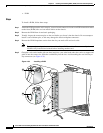
Step 3 Loosen the two captive screws holding the card in place.
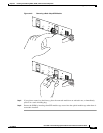
Step 4 Grasp the two card ejector levers and simultaneously pivot both ejector levers 90 degrees (70 degrees for
a newer PLIM) away from the front edge of the card carrier to unseat the card from the backplane
connector.
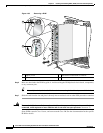
Step 5 Grasp the handle and gently pull the PLIM halfway from the slot (see Figure 4-35):