


2-12
Cisco CRS-1 Carrier Routing System 8-Slot Line Card Chassis Installation Guide
OL-6256-08
Chapter 2 Installing and Removing Power Components
How to Install or Remove the Power Components
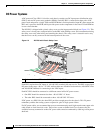
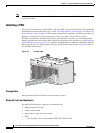
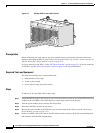
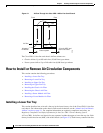
Figure 2-7 AC Wye PDU for the 8-Slot Chassis
Prerequisites
Before performing this task, remove any front cosmetic covers, power down and remove the power
modules, and unplug the PDU. See the
“Before Powering the Chassis Up or Down” section on page 2-8,
and the “Removing a Power Module” section on page 2-15.
If you are removing a DC PDU, see the “DC Power Systems” section on page 2-4; if you are removing
an AC PDU, see the “AC Power Systems” section on page 2-8 for more information.
Required Tools and Equipment
You need the following tools to perform this task:
• ESD-preventive wrist strap
• 10-mm socket wrench
• 8-mm socket or open (box end) wrench
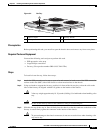
Steps
To remove an AC Wye PDU, follow these steps:
Step 1 Attach the ESD-preventive wrist strap to your wrist and connect its leash to one of the ESD connection
sockets on the rear (MSC) side of the chassis or a bare metal surface on the chassis.
Step 2 Turn the power module power switch to the off position.
Step 3 Disconnect the PDU from the power source.
Step 4 Remove the power module of the PDU that you are removing from the chassis (see the “Removing a
Power Module” section on page 2-15).
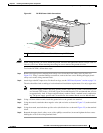
Step 5 On the rear (MSC) side of the chassis, use the socket wrench to remove the 8-mm center holding bolt
and 8-mm nut from the PDU holding plate.
122288