


4-44
Cisco CRS-1 Carrier Routing System 8-Slot Line Card Chassis Installation Guide
OL-6256-08
Chapter 4 Installing and Removing MSCs, PLIMs, and Associated Components
How to Install or Remove a PCMCIA Card
How to Install or Remove a PCMCIA Card
This section contains the following procedures:
• Installing a PCMCIA Card
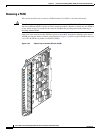
• Removing an RP PCMCIA Card
Installing a PCMCIA Card
This section describes how to install a PCMCIA card in an RP or a DRP card PCMCIA slot. For more
detailed information on PCMCIA cards, see the
“Information About Hard Drives and PCMCIA Cards”
section on page 4-12, or Cisco CRS-1 Carrier Routing System 8-Slot Line Card Chassis System
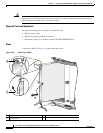
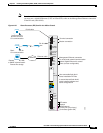
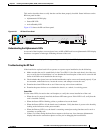
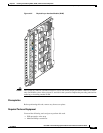
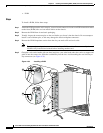
Description. Figure 4-30 shows you the location of the PCMCIA door in the RP card faceplate. (The
PCMCIA cards for the DRP are in a similar location.)
Note Only disk1: can be installed in or removed from the CRS-1 8-slot line card chassis Route Processor.
Figure 4-30 RP Card PCMCIA Slot Door
Prerequisites
If you are replacing a PCMCIA card, see the “Removing an RP PCMCIA Card” section on page 4-45 to
remove the PCMCIA card from the PCMCIA card slot.
Required Tools and Equipment
You need the following tools and part to perform this task:
• ESD-preventive strap
• Medium flat-head screwdriver
• PCMCIA card
Steps
To install a PCMCIA card, follow these steps:
Step 1 Attach the ESD-preventive wrist strap to your wrist and connect its leash to an ESD connection socket
on the front (PLIM) side or a bare metal surface on the chassis.
1 PCMCIA flip-up door
CONSOLE
AUX
HDD
MGMNT ETH
CNTL ETH1
CNTL ETH0
PC CARD
CRS-16-RP
STATUS
PRIMARY
117417
1