


130 PERC 3/DC or PERC 3/DCL Hardware Installation
www.dell.com | support.dell.com
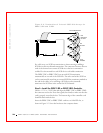
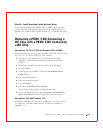
Step 8—Power On Host System
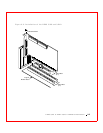
Replace the computer cover and reconnect the alternating current (AC)
power cords. Power on the host computer. Ensure that all SCSI devices are
connected, including SCSI and power cables. If the computer is powered up
before a SCSI device, the device might not be recognized.
During boot, the PERC 3/DC or PERC 3/DCL BIOS message appears: (For
simplicity, only the PERC 3/DC message is shown.)
PowerEdge Expandable RAID Controller BIOS Version xwxx
date
Copyright (c) Dell Computer Corporation
Firmware Initializing... [Scanning SCSI Device...(etc.)...]
The firmware takes several seconds to initialize. During this time the
adapter will scan the SCSI channel. When ready, the following appears:
HA –0 (Bus 1 Dev 6) Type: PERC 3/DC Standard FW xwxx SDRAM=
128MB
Battery Module is Present on Adapter
0 Logical Drives found on the Host Adapter
0 Logical Drive(s) handled by BIOS
Press <Ctrl><H> to run WebBIOS Configuration Utility
The PERC 3 BIOS Configuration Utility prompt times out after several
seconds. The PERC 3/DC or PERC 3/DCL host adapter (controller)
number, firmware version, and cache SDRAM size display in the second
portion of the BIOS message. The numbering of the controllers follows the
PCI slot scanning order used by the host motherboard.
Step 9—Run the PERC 3 BIOS Configuration Utility or
WebBIOS Configuration Utility
Press <Ctrl><M> to run the PERC 3 BIOS Configuration Utility or
<Ctrl> <H> to run the PERC 3 WebBIOS Configuration Utility.
WebBIOS is an HTML-based configuration utility. See Chapter 11 "PERC
3 BIOS Configuration Utility" for information about running the BIOS
Configuration Utility. See the WebBIOS Configuration Utility Guide for
more information about running the WebBIOS Configuration Utility.