


PERC 3 BIOS Configuration Utility 183
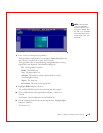
A device selection window displays the devices connected to the
current controller. The failed drives have FAIL indicators.
2 Press the arrow keys to highlight any failed drives to be rebuilt.,
3 Press the spacebar to select the desired physical drives for rebuild.
4 After you select the physical drives, press <F10>.
5 Select Yes at the prompt.
The indicators for the selected drives change to REBLD. Rebuilding
can take some time, depending on the number of drives selected and
the drive capacities.
6 When rebuild is complete, press any key to continue.
7 Press <Esc> to display the Management Menu.
Using a Pre-loaded SCSI Drive “As-is”
NOTE: To use a pre-
loaded system drive in the
manner described here,
you must make it the first
logical drive defined (for
example: LD1) on the
controller it is connected
to. This will make the
drive ID 0 LUN 0. If the
drive is not a boot device,
the logical drive number
is not critical.
You may have a SCSI hard drive that is already loaded with software. The
drive may be a boot disk containing an operating system. If so, add the
PERC device driver to this system drive before you switch to the PERC 3
and attempt to boot from it. You can use the PERC 3 controller as a SCSI
adapter for such a drive by performing the following steps.
1 Connect the SCSI drive to the channel on the PERC 3 controller, with
proper termination and TID settings.
2 Boot the computer.
3 Press <Ctrl><M> to start the BIOS Configuration Utility.
4 Select Configure—> Easy Configuration.
5 Press the cursor keys to select the pre-loaded drive.
6 Press the spacebar.
The pre-loaded drive should now become an array element.
7 Press <Enter>.
You have now declared the pre-loaded drive as a one-disk array. The
logical drive configuration screen displays.
8 Set the Read Policy on the Advanced Menu.
9 Set the Cache Policy on the Advanced Menu.