


EPSON Stylus Photo 750 Revision A
Product Description Function 21
1.4 Function
1.4.1 Control Code
This printer is operated with the raster graphics control code based on
the ESC/P2 control line. Refer to “ESC/PV2 Reference Manual” and
“ESC/P2 specification” for each command and ESC sequence.
1.4.2 Bi-directional Command
† Remote Setting Command
Refer to “Remote Command Specification” for details.
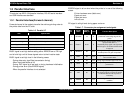
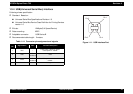
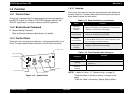
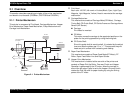
1.4.3 Control Panel
There are 2 non-lock type push switches, 1 lock type push switch and 4
LEDs. The figure below shows the exterior view of the control panel.
Figure 1-12. Control Panel
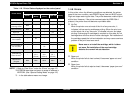
1.4.3.1 Switches
Since this printer does not have so many switches, each button has
several functions. The tables below show their functions and how to
enter those functions for each switch.
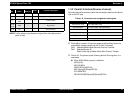
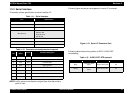
Table 1-15. Panel functions in normal state
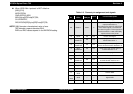
Table 1-16. Panel function with turning on
NOTE: *1: Refer to Table 1-17, “Status printing,” on page 22.
*2:Not described in the User’s manual. (not open to the
users)
*3:See the Table in the section “Special Setting Mode”.
Paper out LED:Red
Ink O ut (Black)LED :Red
Ink O ut (C o lo r) LE D : R e d
Cleaning SW
Load/Eject SW
Power SW
Power LED :Green
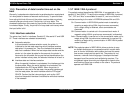
Switch Function
Load/Eject
(Less than 2
seconds)
• Load or eject paper
• When the carriage is on the position for exchanging ink
cartridge, return it to the home position.
Load/Eject
(for 2 seconds)
• Start the ink cartridge exchange sequence; i.e. move the
carriage to carriage exchange position.
Cleaning
(for 2 seconds)
• Start cleaning the print head.
• In the condition of “Ink Low” or “No Ink Cartridge”, start
the ink cartridge exchange sequence.
Cleaning
(Less than 2
seconds)
• When the carriage is on the position for exchanging ink
cartridge, return it to the home position.
Switch to press when
turning on
Function
Load/Eject
• Start status-printing.*
1
Cleaning
• Change code pages/Select IEEE1284.4 mode for
parallel I/F*
2
.
Load/Eject +
Cleaning
• Start special setting mode.*
3