


EPSON Stylus Photo 750 Revision A
Disassembly and Assembly Disassembly 66
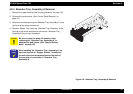
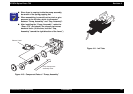
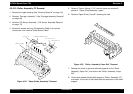
4.2.5.6 Paper Feed Roller Assembly Removal
1. Remove “ASF, Assembly”. (See “ASF, Assembly Removal” on
page -65)
2. Remove “Torsion Spring,41.2” by unhooking one end from the ASF
frame and remove “Lever, Brake”.
3. Remove “Bush, Fixing, Shaft” from the right end of “Shaft, Roller,
LD” and remove “Lever, Hopper, Release”.
4. Move the left paper feed to the center and remove the cam fixing
bush (white plastic) attached to the left side of “Shaft, Roller LD”.
5. Push the “Shaft, Roller, LD” to the left and remove the “Bush, Fixing,
Shaft, Left” after releasing its hook.
6. Unlock the right and left bottom edges of “Hopper Assembly” from
the “Frame, ASF”.
7. Push out “Shaft, Roller, LD” to the right while lifting up the right side
of “Paper Feed, Roller Assembly, Right”, and remove “Shaft, Roller,
LD” from the left side of “Frame, ASF”.
8. Pull out cam part of “Hopper, Assembly” from the right hole of “ASF,
Frame”, holding down the “Upper, Assembly” by hand. From “ASF,
Assembly”, left and right “Paper Feed Roller Assembly” and
“Hopper, Assembly” will be separated.
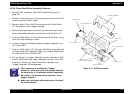
Figure 4-17. ASF Disassembly
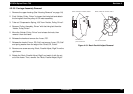
CHECK
POINT
„
When removing or installing the “Hopper,
Assembly”, be careful not to let the grease attach to
the other parts. If it is attached, wipe off completely.
„
Be careful of the direction when installing “Lever,
Hopper, Release”.
„
Make sure that bushes at the both ends of the shaft
are firmly attached.
HOPPER, ASSEMBLY
LEVER, BRAKE
Torsion SPRING, 41.2
BUSH, FIXING, SHAFT, LEFT
FRAME, ASF
LEVER, HOPPER, RELEASE
BUSH, FIXING, SHAFT
SHAFT, RO LLER, LD
CAM part
Paper Feed Roller Assem bly