


EPSON Stylus Photo 750 Revision A
Adjustment Adjustment 78
5.2 Adjustment
This section describes the detailed procedures of each adjustment.
5.2.1 Paper Gap Adjustment
When replacing the carriage assembly or removing it during printer
mechanism disassembly, perform the paper gap adjustment during
assembling and get the standard distance from the surface of the
printing head to the paper surface.
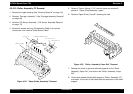
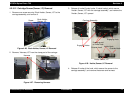
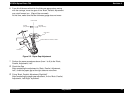
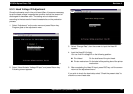
† Paper Gap Adjustment
1. Install the “Bush, Parallel, Adjustment” for right and left frame and
set them on the peaking of the upper frame side so that they match
with the standard mark of “Bush, Parallel, Adjustment”.
2. Set the “Lever, PG” front. (Gap: “0”)
3. Move the carriage to the center and set the thickness
gauge(1.14mm thick) on the fixed position of “Paper Guide, Front;B”
as you can see in the figure5-1.
Figure 5-1. Paper Gap Adjustment
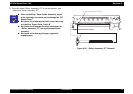
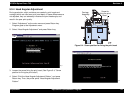
4. Move the carriage to the position that the print head overlaps the
thickness gauge.
5. Move the “Bush, Parallel, Adjustment, Right” to the rear until the
thickness gauge moves with the carriage when you move the
carriage about 20mm right and left. (Gap will be narrowed)
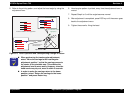
CAUTION
„
Do not scratch special coated surface of the PF
roller and rib surface of “Paper Guide, Front ;B”.
„
Be careful not to leave any dirt or scars on the
surface of the print head.
CAUTION
Do not use the same thickness gauge you used for
Stylus Photo and Stylus Photo 700.
CHECK
POINT
„
Leave the thickness gauge on the flat side of the rib
of the front paper guide;B.
„
When you move the carriage, move it , pulling the
timing belt with your hand.