


EPSON Stylus Photo 750 Revision A
Disassembly and Assembly Disassembly 65
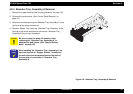
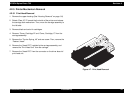
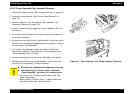
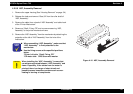
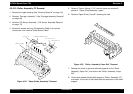
4.2.5.5 ASF, Assembly Removal
1. Remove the upper housing.(See “Housing Removal” on page -54)
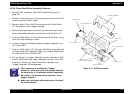
2. Release the hook and remove “Gear,34” from the roller shaft of
“ASF, Assembly”.
3. Remove the cable from a hook of “ASF Assembly” and cable hook
of the “Printer Mechanism”.
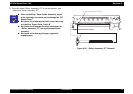
4. Remove a “Shaft, Fixing, CR” and one screw securing “ASF,
Assembly” to the printer mechanism frame.
5. Remove the “ASF Assembly” from the mechanism by detaching the
projection at the left of “ASF Assembly” from the hole of the
mechanism.
Figure 4-16. ASF, Assembly Removal
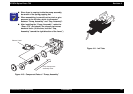
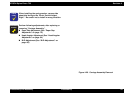
CHECK
POINT
„
When assembling “ASF, Assembly”, make sure that
“ASF, Assembly” is firmly attached to the
mechanism.
„
Use the fixing screws at the specified positions
below.
*Printer Left side: “Shaft, Fixing, CR”
*CR motor side: CBS Screw with washer
CAUTION
When installing the “ASF, Assembly”, be sure that
no cables are pinched between “ASF Assembly” and
frame. Especially, if the cables from the motor is
pinched, there is a danger of short-circuit and
possibly causes hazardous problem such as over-
heating or burning of components.