


EPSON Stylus Photo 750 Revision A
Disassembly and Assembly Disassembly 58
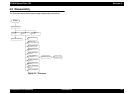
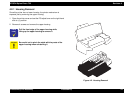
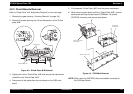
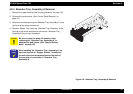
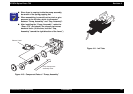
4.2.4 Absorber Tray, Assembly;A Removal
1. Remove the upper housing.(See “Housing Removal” on page -54)
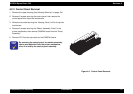
2. Remove the control panel. (See “Control Panel Removal” on
page -57)
3. Remove one screw securing the “Absorber Tray, Assembly;A” to the
right side of the printer mechanism.
4. Remove “Spacer Tray” securing “Absorber Tray, Assembly” at the
left side of the printer mechanism and remove “Absorber Tray,
Assembly;A” by pulling it downward.
Figure 4-6. Absorber Tray, Assembly;A Removal
CAUTION
Be sure to reset the waste ink counter, when
replacing the “Absorber Tray, Assembly;A” or
absorber(ink pad) inside. (See “Special Setting
Mode” on page -22)
CHECK
POINT
After installing the “Absorber Tray, Assembly;A”, be
sure that 2 points of “Stopper Stacker” installed on
the exit roller shaft are pushed back to the back of
the rear side of protrusion of “Absorber Tray,
Assembly;A”.