


EPSON Stylus Photo 750 Revision A
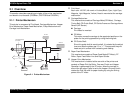
Product Description Function 22
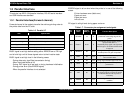
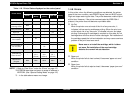
*1(from the previous page): According to the content of 35H of
EEPROM, one of the following actions is carried out.
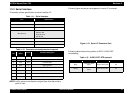
Table 1-17. Status printing
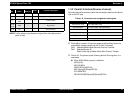
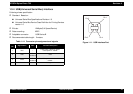
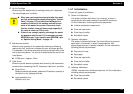
1.4.4 Special Setting Mode
After turning the power on while pressing Load/Eject and “Cleaning”
switches, “Paper Out” indicator blinks for 3 seconds. By pressing the
following switches during this period, following action is carried out.
Table 1-18. Special setting mode
NOTE: *Waste ink counter value and Timer IC counter value are
initialized.
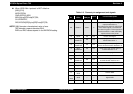
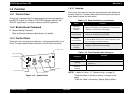
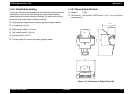
1.4.5 LED Indications
There are 4 LEDs in this printer.
1. Power
Lights when the operate switch is “ON”, and AC power is supplied.
2. Paper Out
Lights during the paper-out condition, and blinks during the paper-
jam condition.
3. Ink Out(Black)
Lights during no Black ink condition, and blinks during the Black ink
low condition.
4. Ink Out (Color)
Lights during no Color ink condition, and blinks during the Color ink
low condition.
See the table on the next page for more detailed LED indications. Since
LED indicates the various errors and current printer operations, LED
indications enable to find out the proper repair operation.
Content of 35H of EEPROM,
[bit7] [bit6]
Action
00
• Print firmware version, ink counter, selected
code page and nozzle check pattern
11
01
• Start hex-dump printing.
10
• Start self test printing.
CAUTION
„
Unlike the previous models, since this printer does
not have EEPROM All Clear function, do not perform
this operation except for the purpose of canceling the
maintenance errors.
„
Be sure to replace the waste ink pad located in the
lower case, when canceling the maintenance error.
„
If you replace the waste ink pad regardless of the
maintenance error, be sure to perform this operation.
Switch Function
Load/Eject
• Initialize EEPROM* and reset time IC.
Cleaning
(for 10 seconds)
• Reset the ink overflow counter in EEPROM.