


EPSON Stylus Photo 750 Revision A
Disassembly and Assembly Disassembly 67
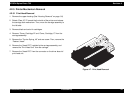
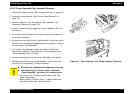
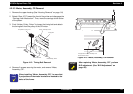
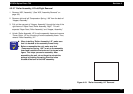
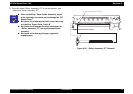
4.2.5.7 Roller Assembly, LD Left/Right Removal
1. Remove “ASF, Assembly”. (See “ASF, Assembly Removal” on
page -65)
2. Remove right and left “Compression Spring, 1.66” from the back of
“Hopper, Assembly”.
3. Pull out the cam part of “Hopper, Assembly” through the hole of the
right frame of “Paper Feed, Roller Assembly, Right”. This will
separate “Paper Feed, Roller Assembly” and “Hopper, Assembly”.
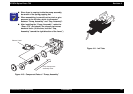
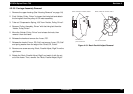
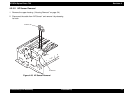
4. Unlock “Roller Assembly, LD” from the assembly frame and remove
“Cover, Roller, LD” by unhooking it from the assembly frame. Then,
remove “Roller Assembly, LD”.
Figure 4-18. “Roller Assembly, LD” Removal
CHECK
POINT
„
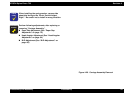
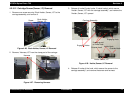
When installing “Roller Assembly, LD”, make sure
that it is hooked to the assembly frame firmly.
„
Before re-assemble the unit, make sure that
“Compression Spring, 1.66” is set on the assembly
frame and hooked to the hooks as it is shown in the
figure. This helps you easier assembly. After
assembling the unit, do not forget to unhook the
springs by rotating the spring from the holes
located at the back of the ASF assembly.