


EPSON Stylus Photo 750 Revision A
Disassembly and Assembly Disassembly 71
4.2.5.10 Roller, Assembly, PF Removal
1. Remove the upper housing.(See “Housing Removal” on page -54)
2. Remove “Carriage, Assembly”. (See “Carriage Assembly Removal”
on page -68)
3. Remove “PE Sensor Assembly”. (“PE Sensor Assembly Removal”
on page -70)
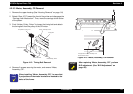
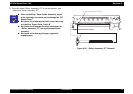
4. Remove 2 screws securing “Guide board, Cable” to the printer
mechanism, then remove “Guide Board, Cable”.
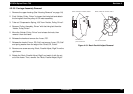
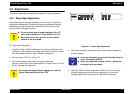
Figure 4-22. “Paper Guide, Assembly” Removal
5. Remove “Torsion Spring,117.6” from the frame and remove 6
pieces of “Paper Guide Assembly, Upper”.
6. Remove “Paper Guide, Front;B”, releasing its hook.
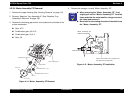
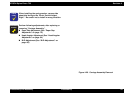
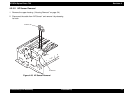
Figure 4-23. “Roller, Assembly, Paper Exit” Removal
7. Release the locks of right and left shaft supports for the “Roller
Assembly, Paper Exit”, and remove the “Roller, Assembly, Paper
Exit”.
8. Unlock and release the left shaft support of “Roller, Assembly, PF”,
and match the cut out of the frame shaft and protrusion of the shaft
support.
PAPER GUIDE, LEFT
(6 pieces)
SHAFT, PAPER GUIDE, UPPER
TORSION SPRING, 117.6
GUIDE PLATE, CABLE
PAPER GUIDE, ASSEMBLY, UPPER