


EPSON Stylus Photo 750 Revision A
Disassembly and Assembly Disassembly 68
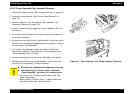
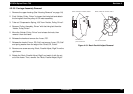
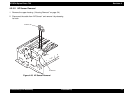
4.2.5.8 Carriage Assembly Removal
1. Remove the upper housing.(See “Housing Removal” on page -54)
2. Push “Holder, Pulley, Driven” to loosen the timing belt and detach
the timing belt from the pulley of CR motor assembly.
3. Take out “Compression Spring, 19.6” from “Holder, Pulley, Driven”.
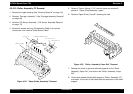
4. Remove “Pulley, Assembly, Driven” with the timing belt from the
“Holder, Pulley Driven”.
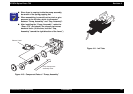
5. Move the “Holder, Pulley, Driven” and release the hook, then
remove it from the frame.
6. Release the hook and remove the “Lever, PG”.
7. Release the hook of “Lever, PG, Sub” and remove “Lever, PG, Sub”
and spring washer from the edge of the “Shaft, CR, Guide”.
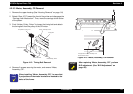
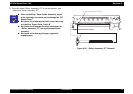
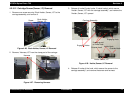
8. Remove one screw securing “Bush, Parallel Adjust, Right” from the
right frame.
9. Rotate the “Bush, Parallel Adjust, Right” and match it with the cut
out of the frame. Then, remove the “Bush, Parallel Adjust, Right”.
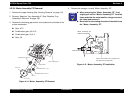
Figure 4-19. Bush Parallel Adjust Removal
BUSH, PARALLEL ADJUST, RIGHT
Side fram e of
printer m echanism
BUSH, PARALLEL ADJUST, RIGHT
C u t o u t o f s id e fra m e