Servicing Boards and Components 147
2. Disconnect all external cables.
3. Remove the server from the rack. Place the server on a hard, flat surface.
See “Remove the Server From the Rack” on page 64.
4. (SPARC Enterprise T5120) Remove the inner glides from the server.
Each inner glide is secured with a locking tab. Release the tab and slide each inner
glide off the server mounting studs.
5. Attach an antistatic wrist strap.
6. Remove the top cover.
See “Remove the Top Cover” on page 67.
7. If you are servicing the hard drive backplane, remove all hard drives.
See “Remove a Hard Drive” on page 71.
Note – Make a note of the drive locations before removing them. You will need to
install the hard drives in the same locations when reassembling the system.
8. If you are servicing the hard drive backplane, remove the DVD/USB module.
See “Remove the DVD/USB Module” on page 139.
9. (SPARC Enterprise T5120 server, 8-HDD model) Remove the following items:
■ Fans in locations /SYS/FANBD0/FM0 through /SYS/FANBD0/FM3.
See “Fan Module Overview” on page 123.
■ Hard drive data cables from the hard drive cage.
10. (SPARC Enterprise T5220 server) Remove the fan modules.
See “Remove a Fan Module” on page 125.
11. (SPARC Enterprise T5220 server) Remove the fan power boards.
See “Remove the Fan Power Board” on page 143.
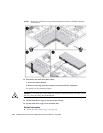
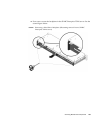
12. Remove the No. 2 Phillips screws securing the hard drive cage to the chassis.
Two screws secure the disk cage to each side of the chassis. See panels 1 and 2 in
the following figure.
13. Slide the hard drive cage forward to disengage the backplane from the paddle
cards.
See panel 3 in the following figure.


