C-4
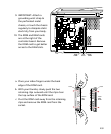
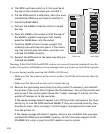
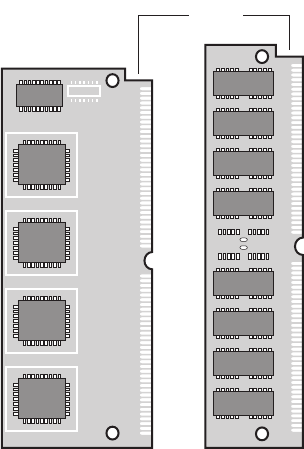
d. The ROM card has a notch in it; this must be at
the top of the contacts when you reinstall it.
e. Put the ROM card in a safe place; after you have
installed the RAM you will need to reinstall it.
11. Install the RAM SIMM.
a. Position the SIMM so that the notch is toward
the top.
b. Place the SIMM in the socket so that the top of
the SIMM is angled toward your left. Gently
press the SIMM down into the socket.
c. Pivot the SIMM so that it moves upright. The
retaining clips will snap into place. If the retain-
ing clips will not snap into place, you have not
inserted the SIMM correctly.
12. Reinsert the ROM card in the same way that you
inserted the SIMM.
Warning: If the RAM SIMM and ROM card are not correctly inserted completely into the
socket, your printer will display an error message when you turn it on and will not operate.
If you are having trouble inserting the SIMM or ROM card:
• Make sure that the cards are in the correct sockets. The ROM card is shorter than the
SIMM.
• Make sure that the notch in each card is toward the top.
13. Remove the grounding wrist strap from the printer (if necessary), and reinstall
the printer’s side cover. Don’t tighten the thumbscrews. Turn on the printer and
wait to see if the control panel shows the “ready” message. If it does, turn the
printer off and go on to the next step.
If the ready message doesn’t appear, turn off the printer and remove the cover.
Gently try to rock the ROM card and SIMMs. If they are inserted correctly, they
should not move. Carry out steps 11 and 12 again, and replace the cover and
turn the printer on.
If the ready message still doesn’t appear, and you are confident that you have
installed the ROM card and SIMM correctly, call GCC technical support at 781-
276-8620 (U.S. only) or your local GCC dealer or service center.
RAM SIMMROM card
Notch


