


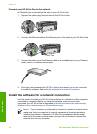

Connect your HP All-in-One to the network
An Ethernet port is provided on the back of your HP All-in-One.
1. Remove the yellow plug from the back of the HP All-in-One.
2. Connect the Ethernet cable to the Ethernet port on the back of your HP All-in-One.
3. Connect the other end of the Ethernet cable to an available port on your Ethernet
router, switch, or wireless access point.
4. Once you have connected the HP All-in-One to the network, go to your computer
to install the software. See Install the software for a network connection.
Install the software for a network connection
Use this section to install your HP All-in-One software on a Windows or Mac computer
connected to a network. Before you install the software, make sure you have
connected your HP All-in-One as described in Wireless infrastructure network setup,
Wireless ad hoc network setup, or Wired network setup.
Note 1 If your computer is configured to connect to a series of network drives,
make sure that your computer is currently connected to these drives before
installing the software. Otherwise, HP All-in-One installation software might
take one of the reserved drive letters, and you will not be able to access that
network drive on your computer.
Chapter 4
70 HP Photosmart 3300 All-in-One series
Network setup