


Chapter 9 Remove/Replace Procedures
81
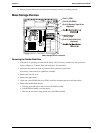
2. Make any settings required by the HP Backup Tape Drive documentation.
The SCSI backup tape drive should not be terminated, but if it is remove the termination jumper. The
default SCSI address for HP Backup Tape Drive is normally set to ID address = 3.
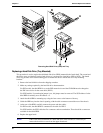
3. Attach the backup tape drive to third mounting tray using the four screws on the sides of the tray.
The optional HP SureStore DAT 24i backup tape drive normally comes with 5¼ inch mounting brackets
installed on the tape drive. If not, follow the instructions provided with the tape drive to connect the 5¼
inch mounting brackets to the tape drive, before installing the tape drive into the third drive tray.
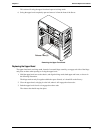
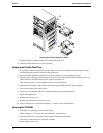
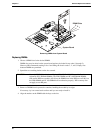
4. Guide the backup tap drive tray into the chassis opening, with the cable connectors toward the rear of
the chassis.
5. At the rear of the backup tap drive tray, carefully connect the power and data cables.
The optional HP backup tape drive comes with a 50-to-68-pin adapter to connect to a 68-pin SCSI cable
used for connection of backup tape drive.
However, in the SCSI models, the optional HP backup tape drive may slow down access time for the
Ultra-160 SCSI hard drives. If this is the case, HP recommends adding another single channel SCSI
controller to control the slower backup tape drive.
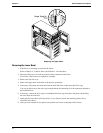
6. Replace the upper bezel.
7. Replace the left side cover.
8. Replace the external cables and power cord.
9. Power on the Server as described in Chapter 2, “Controls, Ports, and Indicators.”
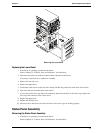
Removing a Hard Disk Drive (Tray Mounted)
This procedure is used to remove the third hard disk drive (HDD) mounted in the fourth shelf.
1. If the Server is operating, power down the Server.
Refer to Chapter 2, “Controls, Ports, and Indicators” for instructions.
2. Disconnect the power cord and any external cables connected to the Server.
If necessary, label each one to expedite re-assembly.
3. Remove the left side cover.
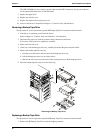
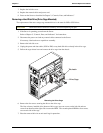
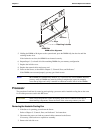
4. At the rear of the HDD tray, carefully disconnect the power and data cables.
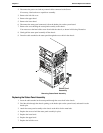
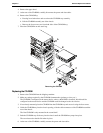
5. Remove the hard disk drive (HDD) by:
a. Pressing in on both release tabs to release the HDD tray.
b. Pull the HDD tray out of the chassis.
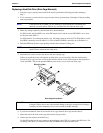
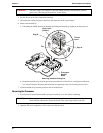
c. Remove the four screws, from below the HDD tray.
6. Place the HDD in an anti-static bag.