82 Hardware Maintenance Manual: xSeries 250
To install a drive in a hot-swap bay:
1. Remove the filler panel from one of the empty hot-swap bays by inserting your
finger into the depression at the left side of the filler panel and pulling it away
from the server.
Attention: To maintain proper system cooling, do not operate the server for
more than 10 minutes without either a drive or a filler panel installed
for each bay.
2. Install the hard disk drive in the hot-swap bay:
a. If there is a small gap above or below the drive, separate the slim filler from
the filler panel, and insert it in the gap.
Note: A drive placement guide is located on the inside edge of the bezel. The
drive placement guide indicates the placement for slim-high drives.
The guide also shows the SCSI ID assigned to the drive.
b. Ensure the tray handle is open (that is, perpendicular to the drive).
c. Align the drive assembly with the guide rails in the bay.
d. Gently push the drive assembly into the bay until the drive stops.
e. Push the tray handle to the closed (locked) position.
f. Check the hard disk drive status indicators to verify that the hard disk drive
is operating properly.
If the amber hard-disk status light for a drive is lit continuously, that
individual drive is faulty and needs to be replaced. If the green hard-disk
activity light is flashing, the drive is being accessed.
Note: If the server has an optional RAID controller installed, you must configure
the disk arrays after installing hard disk drives. Refer to “Using IBM
ServeRAID” on page 117 for information.
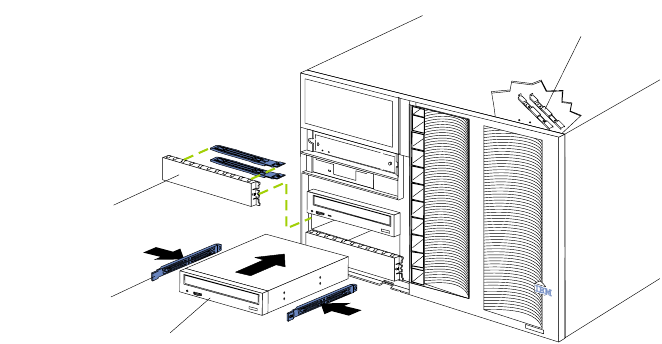
Installing a 5.25-inch removable-media drive
Refer to the following illustrations when installing a 5.25-inch removable media drive.
Before you begin:
• Read “Safety information” on page 180.
• Review the information in “Before you begin” on page 58.
• Read the documentation that comes with the option.
Drive
Slide rails
Filler panel with
EMI sheild
Slide rails for
use with a tape drive


