


Installing options 83
Choose the bay in which you want to install the drive. Also, check the instructions
that come with the drive to see if you need to set any switches or jumpers on the
drive.
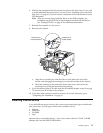
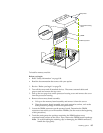
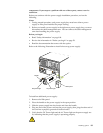
To install a removable-media drive in one of the left front bays:
1. Turn off the server and all attached devices. Disconnect all external cables and
remove the top cover.
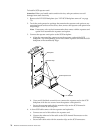
2. Remove the media-bay bezel.
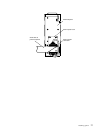
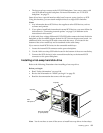
3. Remove the filler panel from the bay opening. Keep the filler panel nearby.
Note: The server EMI integrity and cooling are both protected by having the left
front bays covered or occupied. When you install a drive, save the filler
panel from the bay, in case you later remove the drive and do not replace it
with another.
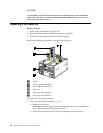
4. Touch the static-protective bag containing the drive to any unpainted metal
surface on the server; then, remove the drive from the bag and place it on a static-
protective surface.
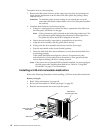
5. Remove the snap-on slide rails from the filler panel and snap the rails on the
drive. Store the filler panel for later use.
Note: Slide rails for installing a tape drive are attached with screws. Use the
screws to attach the rails to the side of the tape drive.
6. Align the slide rails on the drive with the guide rails in the bay; then, slide the
drive into the bay until it snaps into place.
Note: If you are installing a tape drive, use the screws that are shipped next to
the tape drive rails to attach the tape drive to the front of the chassis.
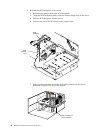
7. Disconnect the shuttle (see “Disconnecting the shuttle” on page 108).
8. If you are installing a SCSI device, go to step 9.. If you are installing an IDE
device, go to step 10..
9. Install the two-drop SCSI cable:
a. Locate the two-drop SCSI cable. The two-drop SCSI cable is located in the
bottom of the server between the open bays and the power supply area. It is
folded and restrained with a cable clamp.
b. Connect one of the connectors on the two-drop SCSI cable to the back of the
drive. Go to step 11..
c. Connect the other end of the two-drop SCSI cable to the SCSI connector on
the power backplane.
d. Go to step 11..
10. To install an IDE device, such as a CD-ROM or a DVD-ROM, use the two-drop
IDE cable that comes with the option.
a. Remove the cable that connects the CD-ROM to the IDE connector on the
power backplane.
b. Using the two-drop cable that came with the IDE option, connect the CD-
ROM and IDE device you are installing to the IDE connector on the power
backplane.
c. Set the jumper on the back of the new IDE option as secondary.
11. Connect a power cable to the back of the drive. Power cables for removable-
media drives come installed in the server. The connectors are keyed and can be
inserted only one way.
12. If you are installing another 5.25-inch drive, do so now. Otherwise, continue with
step 13 on page 84.