


Default Setting (System Menu)
9-72
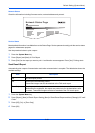
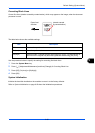
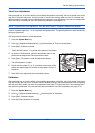
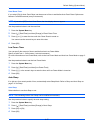
4 Find the location on each chart where 2 lines most closely match.
If this is the 0 position, registration for that color is not required. For
the illustration, B is the appropriate value.
From charts V-1 to V-5, read only the values from V-3 (center).
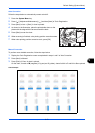
5 Press [Next] of Registration.
6 Press [Change] for the chart to be corrected.
7 Press [+] or [-] to enter the values read from the chart and press
[OK].
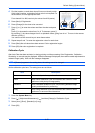
Press [+] to increase the value from 0 to 9. To decrease, press [-].
By pressing [-], the value changes from 0 to alphabetic letters, going from A to I. To move in the reverse
direction, press [+].
You cannot use the numeric keys to enter these values.
8 Repeat steps 6 and 7 to enter the registration values for each chart.
9 Press [Start] after all values have been entered. Color registration begins.
10 Press [OK] after color registration is complete.
Calibration Cycle
After Auto Clear has been activated, or during printing or while processing Color Registration, Calibration...
Remaining: xx seconds may be displayed. While this message is displayed, the machine makes adjustments to
maintain image quality. Wait until the message disappears.
NOTE: If [Custom] appears in the setting items, the setting cannot be changed.
Set the calibration cycle here. The setting items are as follows.
1 Press the System Menu key.
2 Press [ ], [Adjustment/Maintenance], [ ] and then [Change] of Calibration Cycle.
3 Select [Auto], [Short], [Standard] or [Long].
4 Press [OK].
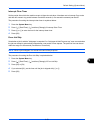
Item Description
Auto Automatically sets the cycle for calibration.
Short Sets a short calibration cycle and increases the number of times
performed, with priority to image quality.
Standard Sets a standard calibration cycle, compromising between image
quality and downtime for processing.
Long Sets a long calibration cycle and decreases the number of times
performed, to ensure minimal downtime.