


Preparation before Use
2-14
Setting Date and Time
Follow the steps below to set the local date and time at the place of installation.
When you send an E-mail using the transmission function, the date and time as set here will be printed in the
header of the E-mail message. Set the date, time and time difference from GMT of the region where the machine
is used.
NOTE: If user login administration is enabled, you can only change the settings by logging in with
administrator privileges. If user login administration is disabled, the user authentication screen appears. Enter
a login user name and password, and press [Login]. Refer to Adding a User (Local User List) on page 10-5 for
the default login user name and password.
Be sure to set the time difference before setting the date and time.
If you change Date/Time setting, trial functions will be unavailable. For details, refer to Optional Function on
page 9-110.
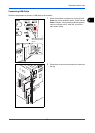
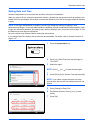
1 Press the System Menu key.
2 Press [ ], [Date/Timer] and then [Change] of
Time Zone.
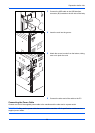
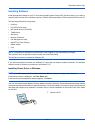
3 Select the region.
NOTE: Press [ ] or [ ] to view the next region.
4 Press [Off] or [On] of Summer Time and press [OK].
NOTE: If you select a region that does not utilize
summer time, the summer time setting screen will not
appear.
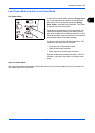
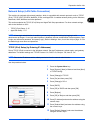
5 Press [Change] of Date/Time.
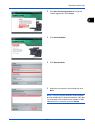
6 Set the date and time. Press [+] or [–] in each
setting.
7 Press [OK].
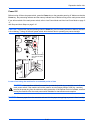
Date/Timer - Time Zone
Set time zone.
Select the location nearest you.
Time Zone
-12:00 International Date Line West
1/13
-11:00 Samoa
-10:00 Hawaii
-09:00 Alaska
-11:00 Universal Coordinated Time-11
-08:00 Baja California
Status
Cancel
OK
10/10/2010 10:10
Date/Timer - Date/Time
Set the date and time.
Off
DayMonthYear
SecondMinuteHour
2010
10 10 31
10 10
Status 10/10/2010 10:10
Cancel
OK