


Installing the optional ServeRAID-MR10i SAS/SATA controller
The optional ServeRAID-MR10i SAS/SATA controller can be installed only in its
dedicated connector, PCI slot 1, on the system board. The ServeRAID-MR10i
adapter is supported on hot-swap server models only. The ServeRAID-MR10i
SAS/SATA adapter enables integrated RAID levels 0, 1, 5, 6, 10, 50, and 60
support capability on hot-swap hard disk drives. For configuration information, see
the documentation on the ServeRAID CD that comes with the adapter.
Important: To ensure that any of your ServeRAID 10i, 10is, or 10M adapters
function properly on UEFI-based servers, make sure that the adapter firmware level
is updated to at least 11.xx-XXX, and the supporting drivers.
Attention: Some cluster solutions require specific code levels or coordinated code
updates. If the device is part of a cluster solution, verify that the latest level of code
is supported for the cluster solution before you update the code.
To install the ServeRAID-MR10i adapter, do the following:
1. Read the safety information (see “Safety” on page vii and “Installation
guidelines” on page 37).
2. Turn off the server and peripheral devices, and disconnect the power cords
and all external cables. Remove the side cover (see “Removing the side cover”
on page 43).
Attention: To avoid breaking the retaining clips or damaging the
ServeRAID-MR10i adapter connector, open and close the clips gently.
3. Remove the side cover (see “Removing the side cover” on page 43).
4. Carefully position the server on its side so that it is lying flat and facing up.
Note: Do not allow the server to fall over.
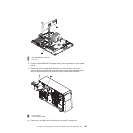
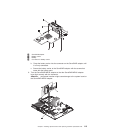
5. Remove the screw that secures the expansion-slot cover to the chassis (if no
adapter is installed in the slot). Store the expansion-slot cover and screw in a
safe place for future use.
Note: Expansion-slot covers must be installed on all vacant slots. This
maintains the electronic emissions standards of the server and ensures proper
ventilation of server components.
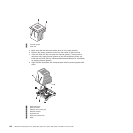
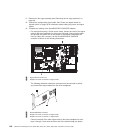
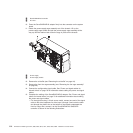
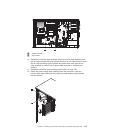
6. Open the retaining clips on each end of the ServeRAID-MR10i adapter
connector on the system board.
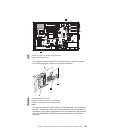
7. Touch the static-protective package that contains the ServeRAID-MR10i
adapter to any unpainted metal surface on the server. Then, remove the
ServeRAID-MR10i adapter and battery pack from the package.
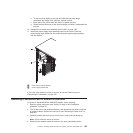
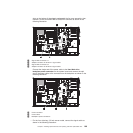
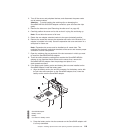
8. If the battery pack (battery carrier and battery) did not come installed on the
ServeRAID adapter, install the battery pack.
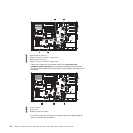
a. Align the battery carrier pins and the connector for the battery carrier with
the pin holes and connector on the ServeRAID adapter; then, lower the
battery carrier onto the ServeRAID adapter.
112 ThinkServer TD200 Types 3724, 3808, 3809, 3815, 3817, 3824, 3826, 3836: Installation and User Guide