


11
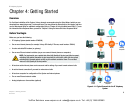
Chapter 4: Getting Started
Instructions for Installing the IP Telephony System
IP Telephony System
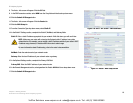
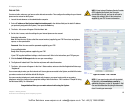
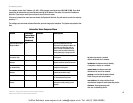
18. The Router - Status screen will appear. Verify that the following settings match your entries:
• WAN Connection Type - Static IP
• Current IP
• Current Netmask
•Current Gateway
• Primary DNS
Proceed to the next section, “Connect the Internet Phones.”
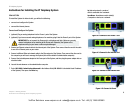
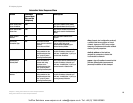
Connect the Internet Phones
1. Connect an Ethernet network cable to one of the Ethernet ports on your router. Then connect the other end of
the cable to an Ethernet port on a network switch.
2. Connect the switch’s power adapter to its power port, and then plug the power adapter into an electrical
outlet.
3. Connect an Ethernet network cable to an Internet phone. Then connect the other end to one of the Ethernet
ports on the switch.
(If the Internet phone has been used before, reset it to its factory default settings first. Refer to its
documentation for more information.)
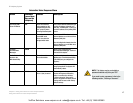
4. Connect the Internet phone’s power adapter to its power port, and then plug the power adapter into an
electrical outlet.
5. The Internet phone will reboot two to three times (each reboot may take up to one minute). The System will
automatically assign an extension number to the Internet phone. When the Internet phone displays it
extension number, then it is ready for use.
6. Repeat steps 3-5 until you have installed all of your Internet phones.
Congratulations! Now you can make calls from one Internet phone to another by dialing an
extension number.
Continue to the next section to configure the System for external calls.
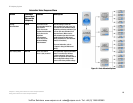
NOTE: The System automatically registers Linksys SPA-family Internet phones (including
model number SPA941). If you connect a different SIP-compatible phone, then registration
will be manual. Refer to the documentation for your phone.
NOTE: The default SIP port of the System
is 6060.
VoIPon Solutions www.voipon.co.uk sales@voipon.co.uk Tel: +44 (0) 1245 600560