D8B Manual • Chapter 3 • page 80
foreground data curve is subject to all clipboard
operations, while the back page curve remains
untouched. To update either the foreground or
background view, click on the drop-downs, drag
across the type field or channel and release the
mouse on the highlighted desired item.
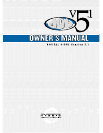
Flip View Button
This button swaps the Page and Back param-
eter views in the Mix editor. For example, if
“Fader” is foreground and “Mute” is background,
clicking on the flip button toggles the view to
show “Mute” as foreground and “Fader” as
background. Toggling the flip once more flips the
view back to the original view of “Fader” as
foreground and “Mute” as background.
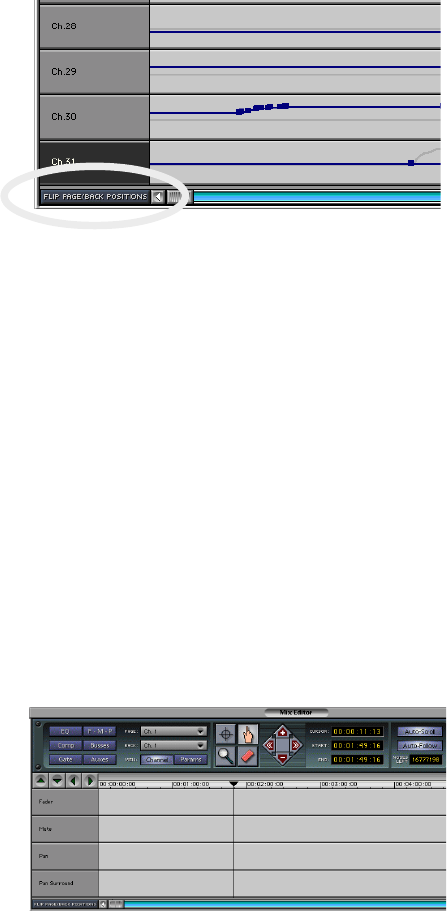
Channel/Params Views
• When Params (Parameters) view is selected, the
Mix Editor provides a view of a single parameter
across multiple channels. The parameter is
selected in the Page pull-down box.
• When Channel view is selected, you can view
multiple parameters of a single channel. The
channels are selected in the Page pull-down box,
which include Channels 1-48, the Master Fader,
Groups 1-8, Buses 1-8, Plug-ins 1-16, FX 1-16,
Returns 1-8, and MIDI channels 1-8.
• The Back pull-down box allows you to view
parameters for a different channel in the
background for comparison.
The six buttons to the left of the Page and Back
pull-down lists act as filters for parameter selection:
• When none of these six buttons is pressed, all
data is displayed for the selected channel.
• Highlight the EQ button to display EQ data only.
• Highlight the Comp button to display
compression data only.
• Highlight the Gate button to display gate
data only.
• Highlight the FMP button to display fader,
mute, and pan data only.
• Highlight the Busses button to display bus
data only.
• Highlight the Auxes button to display aux
data only.
These buttons can be selected in combination
with each other. For example, to view EQ and com-
pression data, simply highlight both EQ and Comp.
Edit Tools
Left-click on the Mix Editor tools to select
them. At any time, right-click in the Mix Editor
automation data to open a pop-up list for quick
and easy selection of the desired Edit Tool
(Crosshair, Hand, Magnify, or Eraser).
Pointer Tool (Hand Tool)
• Use this tool to enter new data nodes and to alter
existing ones.
• While the Pointer tool is selected, press the
Control key to momentarily select the Erase tool.
• The Pointer tool can create and move new or
current automation nodes (curve turning points)
while time code is being received (on the fly
editing—before or to the left of the current time)
or while time code isn’t being received (at any
point on the timeline).
Shift+Pointer Tool
• With the Pointer tool selected, press and hold the
Shift key and notice that the hand turns into a
double-headed vertical arrow. This editing mode
allows you to drag automation lines (and
surrounding nodes) vertically without changing
the time (horizontal value) at which the
automation occurs. This is useful if you want to
raise or lower a section of automation as a group.
• Shift+click an automation line to edit the line and
the two nodes on either end of the line you click.
• If you select a region with the Highlighter tool
first, and then hold the Shift key and edit with the
Pointer tool, all nodes contained within the
selection are edited as a group. Again, they are
constrained to vertical motion only.
Highlighter Tool (Crosshair)
• Use this tool to select data by time and channel.
• Select the Highlighter tool and click and drag
across a track to highlight a specific time region.
• Click on another track name field to move the
current highlighted region (time segment) to the
selected track.
• Click and drag across the top timeline bar to
select specific sections of time across all tracks.
• Double-click on one track to select the entire 24
hours of data.
Note: You can select multiple adjacent
channels (in Channel View) or multiple adjacent
parameters (in Param View) by pressing the Shift
key on the keyboard while clicking on tracks.
You can select multiple non-contiguous
channels or parameters by pressing the Ctrl key
on the keyboard while clicking on tracks.