Installation
2-53160-A2-GB22-10 December 1996
Box Contents
The 3160/3164 DSU/CSU product arrives in a single
box and should contain the following:
•
One 3160/3164 DSU/CSU standalone unit
• One 14.5 foot VF cable
• One power transformer
• One
ACCULINK 3160/3164 DSU/CSU Refer
ence
Card
• One
ACCULINK 316x Data Service Unit/Channel
Service Unit Operator
’
s Guide
Please refer all servicing to qualified personnel. The
Download front panel branch is dedicated to DSU/CSU
service and maintenance and is not intended for use by the
customer.
The 3100 Series Front Panel Emulation software is
available separately and is described in the
Front Panel
Emulation Software Installation
section later in this
chapter.
Important Safety Instructions
Read and follow all warning notices and instructions
marked on the 316x DSU/CSU or included in this guide.
NOTE
The Download command is for
use by service personnel only.
Loss of primary data could result
from improper use.
HANDLING PRECAUTIONS
FOR
STA
TIC-SENSITIVE DEVICES
This product is designed to protect
sensitive components from damage
due to electrostatic discharge (ESD)
during normal operation. When
performing installation procedures,
however, take proper static control
precautions to prevent damage to
equipment. If you are not sure of the
proper static control precautions,
contact your near
est sales or service
representative.
For a complete listing of the safety instructions, see the
Important Safety Instructions
section earlier in this guide.
Quick Start Procedure
The following procedure is for experienced DSU/CSU
users who are familiar with the 3160/3164 DSU/CSU
installation process and have no special requirements for
their application.
1. Attach the power cord to the rear of the DSU/CSU
and the other end to a grounded 115 Vac power
outlet.
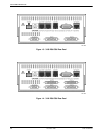
2. Attach the 3160/3164 DSU/CSU network
connection to the T1 network using the
appropriate cable. Attach the 3160/3164
DSU/CSU to the CPE via the DTE (DSX-1)
and/or ports connectors. Adapter cables are
available which allow RS449 or V
.35 devices to
be supported from the EIA 530A connector on the
rear panel. Refer to Appendix H, Equipment List.
See the
3160/3164 DSU/CSU Cabling
section later
in this chapter for more cabling information.
3. Power on the DSU/CSU to perform the power-up
self-test. See the
Power-Up Self-Test
section later
in this chapter for more information.
4. To perform front panel emulation, connect the
cable from the PC to the COM port on the rear
panel of the DSU/CSU. To perform device
management from an async terminal, connect the
terminal to the COM port (or for dial-in access,
the modem port) on the rear panel of the
DSU/CSU. See the 3160/3164 DSU/CSU
Cabling
section later in this chapter for more cabling
information.


